### 一次處理多個 docker container 的生命

在測試使用 docker 時常常都會進行生成/斬掉 container 的動作,在 command line 內一個一個斬掉重續實在太多字要打,以下幾個 command 可以省回不少的時間。

### 一次過停用所有的 container

```sh
$ docker kill $(docker ps -q)
```

### 一次過移除所有的 container

```sh
$ docker rm $(docker ps -a -q)
```

### 一次過移除所有的 images

```sh
$ docker rmi $(docker images -q)
```

### 停用並移除 container

```sh
$ docker rm -f <container_name>
```

有了它們之後覺得非常方便 !
### 長話短說

每一次整個新 VM 出來試野都要搞個 GIT,同埋 Github 要改左一定要強制用 person access token 先可以登入,好難可以記得一個水蛇春咁長的 token 來用,所以不可能每次都打密碼來 clone 同埋 pull。

下面呢句係用來記住 git 登入資料的。

```sh
# 使用 store 方法來記低你的登入資料
$ git config --global credential.helper store
```

另外如果需要 push 的話,就需要設定埋 user name 同埋 email 了。

```sh
# 設定 username
# git config --global user.name user
$ git config --global user.name YOURNAME

# 設定 email
# git config --global user.email user@example.com
$ git config --global user.email YOUREMAIL
```
### 長話短說

Down interface

```sh
# sudo ifconfig enp0s23 down // 舊方法
# sudo ip link set enp0s23 down
```

Up interface

```sh
# sudo ifconfig enp0s23 up // 舊方法
# sudo ip link set enp0s23 up
```
### Error "The table XXX is full"

在起 ndb cluster 時很容易會遇到這個問題,原因有很多,以下會主要介紹幾個。

參考文件 : https://dev.mysql.com/doc/refman/8.0/en/mysql-cluster-ndbd-definition.html

以下這幾個項目如果的內容不夠的話,就會引起 The table is full 錯誤。

- DataMemory
- IndexMemory
- MaxNoOfOrderedIndexes
- MaxNoOfUniqueHashIndexes

當然還有很多設定如果不夠大的話,都會出錯。上面只是其中一部份。
### 方法

首先修改 hostname 檔案 :

```sh
sudo vi /etc/hostname
```

然後修改 hosts 檔案 :

```sh
sudo vi /etc/hosts
```

最後重新開機便可 :

```sh
sudo reboot
```
### 長話短說

改 host 先:

```sql
update mysql.user set host='%' where user='root';
```

然後改認證方法:

```sql
alter user 'root'@'%' identified with mysql_native_password by 'password';
```

完 !
### 錯誤 : Update on an unmounted component
可能大家都會有遇過以下的錯誤 :
> Warning: Can't perform a React state update on an unmounted component. This is a no-op, but it indicates a memory leak in your application. To fix, cancel all subscriptions and asynchronous tasks in the componentWillUnmount method.

### 發生原因
是因為 `setState() ` 發生在 `componntWillUnmount()` 之後,其實這個錯誤並不會引起 UI 上的出錯,它只是告訢你所 setState 的內容因為 Component Unmounted 而不能成功更新 UI。
而筆者的經驗來說,這個情況在 Ajax 時會時常發生,通常 Ajax 在發生在 `componentDidMount()` 時。如果在 Ajax 載入資料時,這是 component unmount 了的話,在 Ajax 回傳時的 callback 如果有 `setState()` 的話,就會發生這個問題。
### 解決問題
方間有兩個比較大跟的方法去解決這個題問。
#### Flag 模式
下面的方法是利用 `_isMounted` 來判定 component 的狀態來決定是否使用 `setState()` 來更新狀態。
```js
class MyPage extends React.Component {
constructor(props) {
super(props);
this._isMounted = false;
}
componentDidMount() {
this._isMounted = true;
fetch('some.json')
.then(r => {
this._isMounted && this.setState(r);
});
}
componentWillUnmount() {
this._isMounted = false;
}
}
```
#### Reference 模式
下面是利用 ref 的方式來推判出 component 的狀態,雖然這個方法比較間接,但相對比較接近原生的語法。
```js
class MyPage extends React.Component {
constructor(props) {
super(props);
this.rootRef = Ref.createRef();
}
componentDidMount() {
fetch('some.json')
.then(r => {
this.rootRef.current && this.setState(r);
});
}
render() {
return (
<div ref={this.rootRef} />
);
}
}
```
在新安裝 VPS 時,如果預設是給我們使用 root 登入的話,我們可能要自己設定一位 sudo user 來代替 root 登入。而新開的使用者如果沒有特別做設定的話,預是會使用 /bin/sh 來作為預設的 shell 登入。對於我們平常使用 bash 的人而言,實不在不習慣。以下就整合了基本的建立使用者步驟,免得日後又要東找西找。

以下會使用 `newuser` 為作新使用者的登入名稱。

### 加新使用者

建立新的使用者。

```sh
# useradd newuser
```

### 修改使用者密碼

修改新使用的密碼。

```sh
# passwd newuser
```

### 把使用者加入到 sudo 群組

把新加的使用者加入到 sudo 群組,新的使用者就可以透過使用 sudo 指令來使用 root 權限。

```sh
# usermod -aG sudo newuser
```

查看使用者的群組。

```sh
# groups newuser
newuser: newuser sudo
```

### 建立及設定 home directory

建立 home folder 給使用者。

```sh
# mkdir /home/newuser
```

變更 home folder 的擁有者。

```sh
# chown newuser:newuser /home/newuser
```

設定剛剛建立的 home folder 為使用者的預設 home。

```sh
# usermod -d /home/newuser newuser
```

### 設定使用者預設的 shell

如果你建立的使用者是可以經由 ssh 登入到主機,可以為他設定一個預設的 shell。

以下指令可以查看您現時系統有什麼 shell 可以選擇。

```sh
# cat /etc/shells

/bin/sh
/bin/bash
/usr/bin/bash
/bin/rbash
/usr/bin/rbash
/bin/dash
/usr/bin/dash
/usr/bin/tmux
/usr/bin/screen
```

然後再用以下的指令就可以設定使用者登入的 shell。

```sh
# usermod --shell /bin/bash newuser
```

### 登入到 bash 後發覺沒有文字顏色

完成以上的設定後應該可以常順利登入到新建立的使用者了,可是 bash 不會為 folder 或者 executable 的檔案加入正確的顏色。原因是因為沒有設定好 `~/.bashrc` 的內容。這個檔案就裝著了 bash 的一些使用者設定,包括有對顏色的控制。不過由於設定是非常複習的,所以筆者是從 root 使用者那裏複製過來就好。

複製 root 使用者的 `.bashrc` 檔案到自己的 home folder :

```sh
$ sudo cp /root/.bashrc ~/
```

然後套用設定 :

```sh
$ source ~/.bashrc
```

完成後應該可以在 `ls` 指令中看到文字色彩了。

### 設定 `.profile`

完成好上面的設定後,雖然可以看到效果,但是當使用者登出後就會重設設定,要再次運行 `source ~/.bashrc` 才可以套用設定。

這是我們需要設定 `~/.profile` 來為我們自動在登入時載入設定。不過由於設定是非常複習的,所以筆者也是從 root 使用者那裏複製過來就好。

複製 root 使用者的 `.profile` 檔案到自己的 home folder :

```sh
$ sudo cp /root/.profile ~/
```

然後套用設定 :

```sh
$ source ~/.profile
```

完成設定後,在登出登入後也能自動載入設定了。
有時可能在新安裝的 Linux 上,在使用 sudo command 時遇到以下的問題。

```sh
$ sudo ls
sudo: unable to resolve host
```

雖然在實際應用時不會對使用上有任何的影響,不過每次 sudo 時會走出來總是讓人覺得不耐煩。

### 原因及解決方法

原因是因為系統無法解釋你的主機名稱。我們可以讀取以下的檔案 :

```sh
$ sudo cat /etc/hostname
```

內檔案內只有一行記錄儲起現時主機的名稱。我們先記住這個名稱。然後再修改以下檔案 :

```sh
$ sudo vi /etc/hosts
```

加入這行 :

```sh
127.0.0.1 <剛剛記錄的主機名稱>
```

然後儲存檔案。這樣就可以解決了。
### Android Studio

作為用來寫 Android App 專用的工具,它的運作也是要靠著 JDK 的。剛剛在重裝電腦時,在重裝了 Android Studio 後發現無法啟動,原因是因為沒有安裝好 JDK。那麼只可以乖乖的去 Oracle 找個最新的 JDK 下載來用好了。

安裝好及設定好 JAVA_HOME 後,發現還是無法啟動 Android Studio !!!

```js
JAVA_HOME=C:\Program Files\Java\jdk1.x.x_xx
```

### 解決方法

原來還要把 JDK 的 bin 資料夾加入到 PATH 最尾才能正常啟動 ...

```js
PATH=<PATH 原先內容>;C:\Program Files\Java\jdk1.x.x_xx\bin\
```


### 參考文章

這是在 Google 找到的大神解決方法原文:

https://code2care.org/2015/cannot-start-android-studio-no-jdk-found
### Remote Desktop When using remote desktop, its saved your connection ip / domain name to window registry for your quick access. But sometime you may not want window keep your connection history (e.g. public computers). 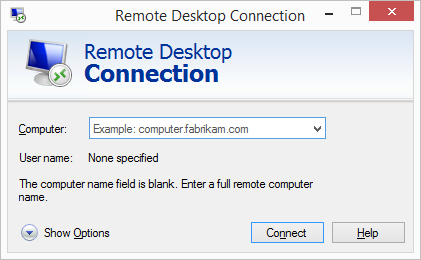 ### How to clear connection history Because remote desktop use window registry to save your connection history data. So you may remove the appropriate registry key to archive this. The following shell command has made for this: ```sh @echo off reg delete "HKEY_CURRENT_USER\Software\Microsoft\Terminal Server Client\Default" /va /f reg delete "HKEY_CURRENT_USER\Software\Microsoft\Terminal Server Client\Servers" /f reg add "HKEY_CURRENT_USER\Software\Microsoft\Terminal Server Client\Servers" attrib -s -h %userprofile%\documents\Default.rdp del %userprofile%\documents\Default.rdp del /f /s /q /a %AppData%\Microsoft\Windows\Recent\AutomaticDestinations ```
### Create Bash script

You may simple use the following code to save as a bash script to clear docker log.

```sh
#!/bin/bash -e

if [[ -z $1 ]]; then
    echo "No container specified"
    exit 1
fi

if [[ "$(docker ps -aq -f name=^/${1}$ 2> /dev/null)" == "" ]]; then
    echo "Container \"$1\" does not exist, exiting."
    exit 1
fi

log=$(docker inspect -f '{{.LogPath}}' $1 2> /dev/null)
truncate -s 0 $log
```

### Usage

Use `docker ps` to list each docker container and find their id's.

```sh
$ docker ps
```

Clear docker log by provide docker name as first parameter of the script.

```sh
$ ./docker-clear-log my-nginx-container
```

Enjoy : )
### On AWS To resize the root volume of an EC2 instance, you can do the following steps: 1. Login to AWS console, navigate to "EC2" . 2. Select an instance. 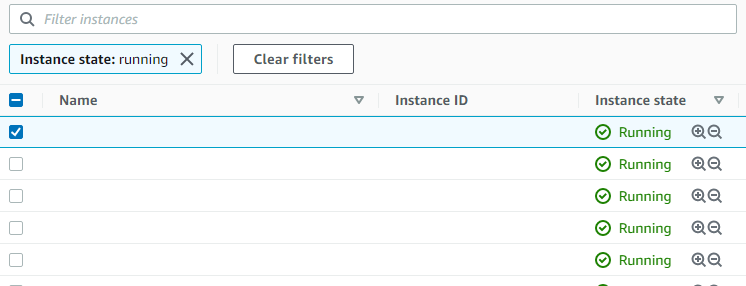 3. Click the "Storage" tab.  4. Click on the volume that you want to resize. 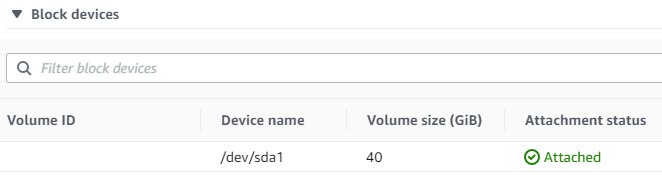 5. Then you may redirected to volumes listing page, select the target volume and click "Action > Modify Volume". 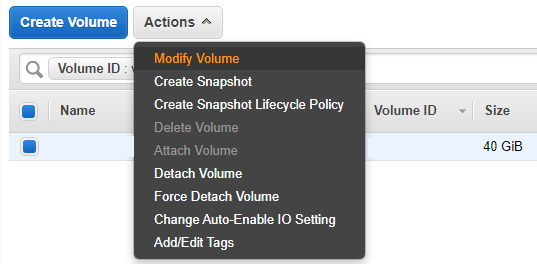 6. Now you may resize the volume. 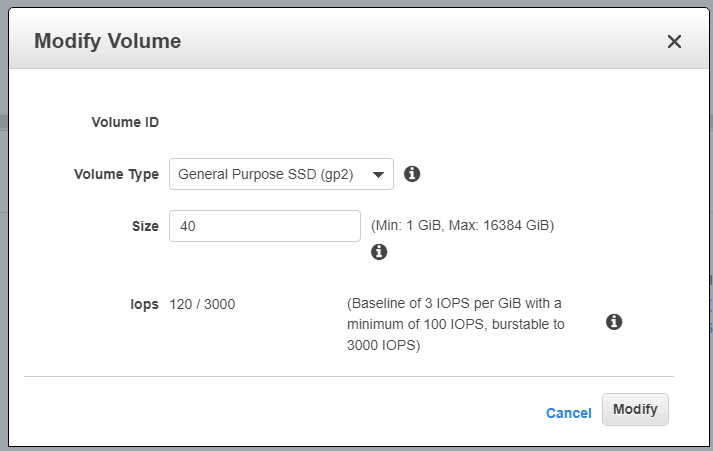 ### On your EC2 instance To take effect on your EC2 instance, you may do some action on you instance: > Reference: https://docs.aws.amazon.com/AWSEC2/latest/UserGuide/recognize-expanded-volume-linux.html#extend-file-system 1. Use `df -h` check the current disk mount points and partition. 2. Use `lsblk` to check disk and partitioning. 3. Use `sudo growpart /dev/xvda 1` to grow the partition to use entire disk spaces. 4. Use `lsblk` to check the result. 5. Use `sudo resize2fs /dev/xvda1` to extend the volume of partition. Enjoy : )
### glogg

glogg 的官方網站

[https://glogg.bonnefon.org/](https://glogg.bonnefon.org/)

這個工具可以開啟數十 GB 的 log file,看似無論檔案多大它好像也能夠開啟 ! 配合使用 Regular Expression 來找出想要看的行數,真的是睇 log 無難度 !
要 Backup MySQL DB 可以有好多種不同的方法,這次是使可比較可以 automate 的方法來進行 Backup 工作。

### mysqldump

mysqldump 其實是一個指令,用來連接 MySQL DB 並把輸出變成為一個 .sql 檔案備份。

以下的指令會完整的備份整個 DB 到 .sql 檔案內。

```sh
$ mysqldump -u {USER} -p -h {HOST} --port={PORT} --databases {DATABASE NAME} > /path/to/backup.sql
```

如果只是想備份 Databse 的架構,而不需要資料的話,可以使用以下的指令。

```sh
$ mysqldump -u {USER} -p -h {HOST} --port={PORT} --no-data --databases {DATABASE NAME} > /path/to/backup.sql
```

主要是加入了 `--no-data` 來達成。
可以通過以下的 CSS 來達成,原理是使用了多重的文字陰影。

```css
.text-border {
	textShadow: '2px 0 0 #FFFFFF, -2px 0 0 #FFFFFF, 0 2px 0 #FFFFFF, 0 -2px 0 #FFFFFF, 1px 1px #FFFFFF, -1px -1px 0 #FFFFFF, 1px -1px 0 #FFFFFF, -1px 1px 0 #FFFFFF';
}
```
當你在 Linux 上啟動 expo service 時,有可能會遇到以下的問題。 > System limit for number of file watchers reached watch expo 原因是因為 Linux 上是使用 `inotify` 來接收檔案變更的事件,以達成 Watch 功能。但是當要 watch 的檔案到達上限時,就會出現上面的 Error。 ### 解決方法 我們可以通過加大 Watch 的檔案數量來解決: 開啟設定檔。 ```sh $ sudo gedit /etc/sysctl.conf ``` 在檔案的最底下加入這句,然後儲存。 ```sh fs.inotify.max_user_watches=524288 ``` 可以用以下指令來查看變更後的情況。 ```sh sudo sysctl -p ``` 完成後就能夠順制啟動了 
> Source: https://serverfault.com/questions/980571/can-i-delete-access-log-files-in-nginx-will-it-cause-an-issue

You can remove access.log as root user, or using sudo.

```sh
sudo rm /var/log/nginx/access.log
```

However after deleting it, the file will not be re-created until nginx is re-loaded or re-started. To reload nginx do:

```sh
sudo service nginx reload
```

To re-size the file to 0 bytes, without having to re-load or re-start nginx, use the truncate command:

```sh
sudo truncate --size 0 /var/log/nginx/access.log
```
> Source: https://stackoverflow.com/questions/9781218/how-to-change-node-jss-console-font-color

Below you can find colors reference of text to command when running node.js application:

```js
console.log('\x1b[36m%s\x1b[0m', 'I am cyan');  //cyan
console.log('\x1b[33m%s\x1b[0m', stringToMakeYellow);  //yellow
```

Note `%s` is where in the string (the second argument) gets injected. `\x1b[0m` resets the terminal color so it doesn't continue to be the chosen color anymore after this point.

### Colors reference

```js
Reset = "\x1b[0m"
Bright = "\x1b[1m"
Dim = "\x1b[2m"
Underscore = "\x1b[4m"
Blink = "\x1b[5m"
Reverse = "\x1b[7m"
Hidden = "\x1b[8m"

FgBlack = "\x1b[30m"
FgRed = "\x1b[31m"
FgGreen = "\x1b[32m"
FgYellow = "\x1b[33m"
FgBlue = "\x1b[34m"
FgMagenta = "\x1b[35m"
FgCyan = "\x1b[36m"
FgWhite = "\x1b[37m"

BgBlack = "\x1b[40m"
BgRed = "\x1b[41m"
BgGreen = "\x1b[42m"
BgYellow = "\x1b[43m"
BgBlue = "\x1b[44m"
BgMagenta = "\x1b[45m"
BgCyan = "\x1b[46m"
BgWhite = "\x1b[47m"
```