這裏講的 Promise 不是講的 "邦民" 的。而是講 Javascript 上的 Promise。

### 起源

自從 AJAX 技術興起後,異步的 Javascript 有了很多元化的發展,當然萬變不離其中也是使用 Callback 的方法來達成 ( 也即是 Observe Pattern 的簡化版 )。由 Async Waterfall 到現時 Promise 方法處理異步 Callback,當中經過了很多時間變化。

### 語法

現時 Promise 是一個 Javascript 的原生 Object (ES2015 後),用來處理 Javascript 異步的回傳。

```js
// create new promise
var promise1 = new Promise((resolve, reject) => {

	// your task here
	setTimeout(() => {

		// random condition
		if( Math.round(Math.random() * 10) > 5 ) {

			// success and callback data
			resolve('foo');
		} else {

			// failure and callback error
			reject(new Error('bar'));
		}
	}, 100);
});

// handle promise success
const success = data => console.log(data);

// handle promise failure
const failure = error => console.error(error);

// handle promise result
promise1.then(success, failure);
```

而當這個 Promise Object 建立的同時,自定義的功能已經在背後異步運行的了。運行完的結果可以透過使用 `resolve` 回傳出去。

我們則可以利用 `then` 功能把回傳成功的值接住。第一個參數是接著一個 function,用來處理成功時的結果,第二個參數也是接著一個 function,不過就用來接著失敗時的 error。

另外 Promise 不只是只有這些功能的,下面這個 Link 會有更多的功能介紹 !

https://developer.mozilla.org/zh-TW/docs/Web/JavaScript/Reference/Global_Objects/Promise
我們可以通過 CSS `line-height` 屬性來設定文字行高。

### 語法

以用以下方法,可以把設定行高的屬性加入到 `div` 內。

```css
div.a {
	line-height: normal;
}

div.b {
	line-height: 1.6;
}

div.c {
	line-height: 80%;
}

div.d {
	line-height: 22px;
}
```

### 值的解說

以下為一部份值的解說。

|值|說明|
|---|
|inherit|承計母系容器的文字行高設定|
|normal|預設的文字行高|
|任何數值|這個數字會把文字的行高乘上這個數值,可以是小數|
|高度|一個實際的高度,是數字加上刻度,例如 `px`|
|百份比|像任何數值一樣,不過以百份比來設定|
經過幾個月來的更新,現在 19Site 都算是走向正正式式一個 Blog 的型態。排版上已經和一般的 Blog 大體上差不多 ( 中間經過了大量修改 ) 。

由最初時的 Blogger 然後到使用 PHP + Laravel 到現時的 NodeJS + ReactJS。可能因為本對 Javascript 也是比較熟,所以用起上來還是由頭到尾全部使用 Javascript 比較易處理。Blogger 不是不好,不過就是太過單調 (對於筆者來說)。而 PHP + Laravel 當然是十分強勁,大中小型 Project 都是十分合適的。不過如果要說到前後介面的整合性,筆者暫時感覺只有 NodeJS + ReactJS 是最易處理的。

### 共用 Library

由於大家都是 Javascript,都可以說是同聲同氣,一份 NPM 齊齊兩份用 ! 就以 Axios 為例,Server 又可以用,Client 又可以用,一個 Library 走編主客。

### 處理客戶端的 AJAX

PHP + Laravel 的強勁地方就是 Blade Template Engine 和他的 ORM 整合,絕對可以講得上是神速開發 !! 資料交互全由 ORM 負責就可以了,加上 `collect()` 功能,是處理資料的最佳 Library。不過也有其弱點,就是每次都要 Full Page Reload...

如果使用 AJAX,就要自行加載 Javascript 檔案處理。相比起 ReactJS,它原生就是以 Javascript 來管理流程,自然可以更加容易整合。

### 總結

總的來說,ReactJS 真是一套很好的工具用來處理高度 reactive 的網站。例如 Chat application 等等,就是用來處理普通如 Blog 的網站也是一樣出色的。
在晚上看電話有時會覺得很光亮,看得眼睛得不舒服。就算是把光暗度調較到最暗的情況下,也是太光亮了。但是 iOS 又不能好像 Android 可以裝第三方的程式 Overlay 一層在別的 Application 上 ( 也就是去藍光濾鏡 APP ),那應該要怎樣好呢? ### 比最暗還要暗 原來在 iOS 上也真的有這樣的功能,不過就要通過使用 Accessibility 來達成了 !! 筆者現時用的是 iOS 13.1.12,因為 iOS 經常更新的關係,所以常常會遇到網上圖片和現手上電話的設定位置有所不同的情況。     這個功能就是用來把減弱白色的輸出,使顯示出來的光亮下降,效果是不錯的,夜貓一族可以試試了。
今天在 Google Search Console 上左看看右看看時,發現了有些奇怪的事情,因為那裏可以看到人們用什麼的關鍵字去搜索網站。當筆者把關鍵字複製然後放到 Google 上 Search 時,發現了有第二個 DNS 指向了 19Site。運作也十分良好 !

以下是指向 19Site 的 URL (已經修正好加入了 redirect 功能) :
http://www.exvatravel.com
### 可能原因
可能是因為筆者用 VPS 的關係,需我用的這個 IP 是有可能是先前這家公司派給其他的戶口使用,所以他的網站把他的 DNS 指向到筆者主機的 IP 上 (他還沒有更新指向他的網站)。就有了一個像鏡像的網站了 !
> 經過調查後發現原來的 IP 是屬於一定韓國的公司 (現在公司的 BLOG 網站 : https://blog.naver.com/payanpayasia ),不知道是不是因為把網站關掉了所以 IP 流到筆者這裏來。看他們的 BLOG 也有些歷史的呢 ! 怪不得常常來了韓國來的 Traffic 。
### 解決方法
筆者這個 Site 是使用 nodejs + KOA 來 Host 的 ( 暴露設定了 !! ),所以要在中間加一重 middleware 來處理 hostname 的問題,把非法的 hostname 重新指向自行設定的 hostname 便可以了 !!
```js
// middleware
App.use(async (ctx, next) => {
if( ctx.request.header.host === 'yourdomain.com' ) {
return next();
} else {
return ctx.redirect('https://yourdomain.com');
}
});
```
如果你用的是 nginx 或者是 apache2 的話,就更加方便了。因為只要在 site enable config 內設定好 server name 就可以了。
我們在使用 MySQL 時也常常會使用 Group By 功能把相同的資料整合出來,然後 Count 出結果的數目。

##### Table : people

|id|name|sex|
|---|
|1|Peter|M|
|2|Mary|F|
|3|Tom|M|
|4|Betty|F|
|5|Flex|M|
|6|Alex|M|

### 使用 count()

Count 是其中一個在 SQL 裏常用的功能,以下的 statement 可以抽出整個資料表的記錄數量。

```sql
select
	count(*) as count
from
	people
```

|count|
|---|
|6|

如能配合 Group By 使用的話,就可以抽出每一個組別的記錄數量 :

```sql
select
	count(id) as count,
	sex
from
	people
group by
	sex
```

|count|sex|
|---|
|4|M|
|2|F|

### 使用 group_concat()

如果使用 group_concat 功能的話,就可以把欄位的值 group 起來在一格欄位轉輸出了。下面是例子

```sql
select
	count(id) as count,
	group_concat(id) as ids,
	sex
from
	people
group by
	sex
```

|count|ids|sex|
|---|
|4|1,3,5,6|M|
|2|2,4|F|

### 自訂分隔符號

逗號 (Comma) 是預設的分隔符號,如果想自訂分隔符號可以使用 `separator` 語法。

```sql
select
	count(id) as count,
	group_concat(id separator '+') as ids,
	sex
from
	people
group by
	sex
```

|count|ids|sex|
|---|
|4|1+3+5+6|M|
|2|2+4|F|

### 不重覆記錄

如果想 group 起來的記錄不要重覆,可以使用 `distinct` 語法。

```sql
select
	count(id) as count,
	group_concat(distinct id separator '+') as ids,
	sex
from
	people
group by
	sex
```

這樣就可以保證抽出來的記錄不會重覆了。
### Config File

設計 Config File 在寫程式時是一個必定會出現的事情,在 Javascript 的世界裏我們可以使用 JSON 檔案來儲存系統的 Config。而在使用 JSON 時又一定會使用到 Tree 的方法來儲存資料。看看以下的例子 `Config.json` :

```json
{
	"app":{
		"port":80,
		"db":{
			"host":"db.abc.com",
			"port":3306,
			"user":"myuser",
			"password":"mypassword",
			"database":"myproject"
		}
	}
}
```

大概有 80% 的系統都會有以下的設定了,最基本的 Database 連線設定檔。

當我們要使用參數時,可以直接匯入要 JSON 檔案然後經 Object 存取資料。

```js
import Config from 'Config.json';

// connect to db
const connectDB = () => {

	var host = Config.app.db.host || 'default host name';
	var port = Config.app.db.port || 3306;
	var user = Config.app.db.user || 'default user';
	var password = Config.app.db.password || 'default password';
	var database = Config.app.db.database || 'default database';
};
```

以上的方法可以把資料從 Config 中讀取出來,還可以設定他們的預設值。但是有一個問題,就是如果 Config 的路徑內有其中一個環節斷掉,程式就會 throw error。例如 :

```js
// config
const Config = {
	"port":80,
	"db":{
		"host":"db.abc.com",
		"port":3306,
		"user":"myuser",
		"password":"mypassword",
		"database":"myproject"
	}
}

// connect db
const connectDB = () => {

	var host = Config.app.db.host || 'default host name';
	var port = Config.app.db.port || 3306;
	var user = Config.app.db.user || 'default user';
	var password = Config.app.db.password || 'default password';
	var database = Config.app.db.database || 'default database';
};
```

因為 Config 中沒有 app 這個屬性存在,所以當運行到 assign host 那句時,就會 throw error 了 !!!

### 解決方法

要解決問題,可以加入檢查就可以了 :

```js
// check every node of config path
var host = (Config && Config.app && Config.app.db && Config.app.db.host? Config.app.db.host: undefined);
```

以上方法可以確保萬無一失,不過又好像寫得太長 !!

### Configuration File 平整化

平整化就是把一個立體的 model 變成為一個單純的 array。我們可以通過 Database First Normalization Form 來達成目的。以下為例 :

```json
{
	"app":{
		"port":80,
		"db":{
			"host":"db.abc.com",
			"port":3306,
			"user":"myuser",
			"password":"mypassword",
			"database":"myproject"
		}
	}
}
```

平整化後可以變成為 :

```json
{
	"app":{
		"port":80,
		"db":{
			"host":"db.abc.com",
			"port":3306,
			"user":"myuser",
			"password":"mypassword",
			"database":"myproject"
		}
	},
	"app.port":80,
	"app.db":{
		"host":"db.abc.com",
		"port":3306,
		"user":"myuser",
		"password":"mypassword",
		"database":"myproject"
	},
	"app.db.host":"db.abc.com",
	"app.db.port":3306,
	"app.db.user":"myuser",
	"app.db.password":"mypassword",
	"app.db.database":"myproject"
}
```

處理好後像 Config 的 Route 檔案,一個 KEY 可以對應到一個 VALUE。在使用上便簡單得多了。

```js
import Config from 'Config.json';

// connect to db
const connectDB = () => {

	var host = Config['app.db.host'] || 'default host name';
	var port = Config['app.db.port'] || 3306;
	var user = Config['app.db.user'] || 'default user';
	var password = Config['app.db.password'] || 'default password';
	var database = Config['app.db.database'] || 'default database';
};
```

這樣就算其中的一層參數繼掉了,也不會 throw error,而是回傳 `undefined`。

### 如何實作平整化

由於 Config 是一種不轉變的資料,所以我們在 Build 時可以使用 Script 產生 Config 檔案。另一個方法是在 Runtime 是進行。而當然前者的效能會較為好,而後者就有更大的彈性。

```js
import Config from 'config';

/**
 * flat config
 */
const flatConfig = (config, path) => {

	// result
	var result = {};

	// init config
	config = config || Config;

	// init path
	path = path || 'Config.';

	// each config attribute
	for( var i in config ) {

		result[path + i] = config[i];

		if( typeof config[i] === 'object' ) {

			result = {

				...result,

				...flatConfig(config[i], path + i + '.')
			};
		}
	}

	// return
	return result;
};

/**
 * read config attribute
 */
const readConfig = path => {

	// get config
	var config = flatConfig();

	// return
	return config[path];
};

// get host
var host = readConfig('Config.app.db.host');
```

上面使用了 Recursion 的方法來處理整個 tree model。大家可以使用自己的方法來實作也可以的喔 !
有讀過初中數學都會接觸過二進位數,如果知道什麼是二進位數的話可以先找找二進位數介紹的文章看看。

### 二進位數的特性

其實二進位和十進位也是數字,但是在某些情況下如果使用二進位數可以更易處理一些電腦上的問題。

如果有玩過 Linux 都會對 755, 777, 741 等數字很敏感 ! 沒錯,這是檔案的權限。其實在背後也是使用了二進位數的特性。

R(read) W(write) X(execute) 分別使用了三支 bit 來記錄獨立的權限。

|R(read)|W(write)|X(execute)|
|---|
|1|1|1|

而三個 bit 組成的二進位數就是它的權限代表數。其實就只有以下這 8 個組合 :

|R(read)|W(write)|X(execute)|decimal number|
|---|
|0|0|0|0|
|0|0|1|1|
|0|1|0|2|
|0|1|1|3|
|1|0|0|4|
|1|0|1|5|
|1|1|0|6|
|1|1|1|7|

0 代表完全沒有權限,7就代表最大的權限。從表格中你可以看到真的可以用 0-7 每一個數字代表一種權限的組合,而且是一定不會重覆的。以這樣的方法來管理權限系統,是可以以最少的 data size 來儲存權限資料。

### 實際使用

上面我們知道了如果把權限用數字的特情來儲存起來,但是在真正應用時我們應如何使用邏輯來判定這個數字是否有權限?

### And 特性

通過對一個二進位數使用 and 時,我們可以得最它們之間的共同值。以下作三個例子 :

|||||
|---|
||0|0|1|
|&|0|0|1|
||0|0|1|

> 001 & 001 = 001

|||||
|---|
||0|1|1|
|&|0|1|0|
||0|1|0|

> 011 & 010 = 010

|||||
|---|
||0|1|1|
|&|1|0|0|
||1|0|0|

> 011 & 100 = 000

And 特性會在兩者數值之間找出共有的保留,而非共有的就會捨去。

### 實作

使用這個特性,我們可以把系統的功能需要權限設為一個常數。

```js
// read
const READ = 0b100;

// write
const WRITE = 0b010;

// execute
const EXECUTE = 0b001;
```

然後每一個 User 有自己的權限儲存在自己的 `rights` 資料內。

```js
// new user
var user = new User();

// set user rights
user.rights = 0b100;
```

然後在 user 使用功能時,對 user 的權限進行檢查:

```js
// read function
function read(user) {

	// check permission
	if( (READ & user.rights) !== READ) {
		throw new Error('permission denied');
	}

	// do something
}
```

我們只需要使用 & 特性,就可以檢查 user 有沒有足夠的權限訪問了 !!
在 WEB 的層面上使用壓縮檔案功能,無非也是要為下載檔案做好準備。一次過下載多個檔案在現今的瀏覽概念還是使用打包的方法比較好,或是如果能下載一個 FOLDER 也是一個不錯的方向 (可惜沒有)。
### 壓縮檔案
要達成把檔案壓縮,最方便也是問 NPM 大神找找有沒有人寫好的 !
https://www.npmjs.com/package/adm-zip
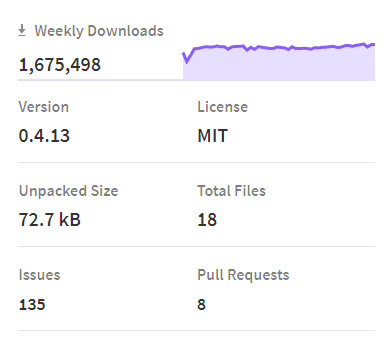
過去一星期 160 萬次數下載,非常可靠的樣子。
這個 Library 可以讀取 ZIP 檔案的內容,也可以把檔案加入到 ZIP 檔案內,是一個完整雙向的 Library,而且方便易用。
當中有一個能力是非常強勢的,就是它可以把 Zip 檔案直接輸出為 Buffer。意味著可以一邊打包一邊輸出? 還需要試一試...
```js
// creating archives
var zip = new AdmZip();
// add local file
zip.addLocalFile("/home/me/some_picture.png");
// get everything as a buffer
var willSendthis = zip.toBuffer();
// or write everything to disk
zip.writeZip(/*target file name*/"/home/me/files.zip");
```
如果是使用 KOA 的話,就可以直接用以下語法輸出到 `response` :
```js
// zip buffer to response
ctx.body = zip.toBuffer();
```
非常方便 !!
有時候你可以需要透過使用 Ajax 的方法來下載檔案,例如使用 `bearer token` 時,所以現代的瀏覽器可以使用以下的方法達成。

### 使用 Axios

在這年代,在使用 Ajax 的大概都是在使用 Axios,這次筆者也是使用 Axios 來達成。

```js
// use axios
Axios({

	// target url
	url: 'http://yourdomain/getfile'

	// get method
	method: 'GET',

	// remote response type, use 'blob' or 'arraybuffer'
	responseType: 'arraybuffer'

}).then(r => {

	// create object url
	const url = window.URL.createObjectURL(new Blob([r.data]));

	// create link to object
	const link = document.createElement('a');

	// set link to object
	link.href = url;

	// set download file name
	link.setAttribute('download', 'download.zip');

	// launch download
	link.click();

	// delete object when download finished
	window.URL.revokeObjectURL(url);
});
```

在上面 `responseType` 可以使用 `blob` 來處理圖片資料,筆者自己親身測試過用 `arraybuffer` 來處理 `zip` 檔案是可以的,但是用 `blob` 來處理 `zip` 檔案就不行了。

以下這條 Thread 有討論過這個問題,筆者也是在當中整合出來 :

https://gist.github.com/javilobo8/097c30a233786be52070986d8cdb1743
每次開新 Project 第一件事必先是要去 GitHub 開一個 Repository 先,然後先會在 Local 開一個資料夾再用 git init 開始,但是因為常常使用 GUI 所以忘記了 Command... 這次來個整合記錄一下。

### 開始工作

正如上面所說,使用 `git init` 當然是不少得 !

```sh
# create new project folder
$ mkdir my_project

# change directory to new project folder
$ cd my_project

# git init
$ git init
```

### 加入 Remote 到你的本機 Git 項目內

接下來就要把你 GitHub 的 URL 加入到 git 內,我們可以使用 `git remote add` 來達成。

`git remote add` 會接受兩個參數。

-	名稱,例如 `origin`

-	URL,例如 `https://github.com/user/repo.git`

```sh
# add remote
$ git remote add origin https://github.com/user/repo.git

# verify remote
$ git remote -v
> origin  https://github.com/user/repo.git (fetch)
> origin  https://github.com/user/repo.git (push)
```

### 從 GitHub 抓取資料

之後應該不難了,因為可以使用 GUI 介面去處理。或是可以使用 `git pull` 來抓取 remote 上的資料。

`git pull` 會接受兩個參數。

-	名稱,例如 `origin`

-	分支的名稱,例如 `master`

```sh
# fetch project
$ git pull origin master
```

然後改改 README.md,再 Create new Branch 為 `develop`,然後 `commit` 再 `push`。這樣就可以開始依照 Git Flow 開發你的項目了 !
### 什麼是 Database Normalization

Database Normalization 是一套方法,可以用來幫助你設定好的你的資料庫。它是由幾個規則所組成。

### First normal form

以下是 First normal form (1NF) 的特點 :

1.	每一個欄位只能有一個單一值。

2.	沒有任何兩筆以上的資料是完全重覆。

3.	資料表中有主鍵, 而其他所有的欄位都相依於「主鍵」。

First normal form (1NF) 是第一個規則,這個規則是規定每一個資料的格子 (Cell) 不可以有多於一個記值存在。例如以下的表格 :

|StudentNumber|StudentName|SubjectName|Teacher|TeacherNumber|Score|
|---|---|---|---|---|---|
|001|Peter|Chinese, English|Mr. Chinese, Mr. English|t01, t02|80, 91|
|002|Mary|Chinese, English|Mr. Chinese, Mr. English|t01, t02|90, 77|
|003|Tom|Chinese, English|Mr. Chinese, Mr. English|t01, t02|100, 55|

在 Score、SubjectName 及 Teacher 的欄位中便有超過一個的值存在著,這樣便和 1NF 的規則違反了。我要需要對這樣的資料進行處理。

最簡單的方法是把重覆的值分別儲存到多個欄位當中。

|StudentNumber|StudentName|SubjectName1|SubjectName2|Teacher1|Teacher2|TeacherNumber1|TeacherNumber2|Score1|Score2|
|---|---|---|---|---|---|---|---|---|---|
|001|Peter|Chinese|English|Mr. Chinese|Mr. English|t01|t02|80|91|
|002|Mary|Chinese|English|Mr. Chinese|Mr. English|t01|t02|90|77|
|003|Tom|Chinese|English|Mr. Chinese|Mr. English|t01|t02|100|55|

這樣的設計就乎合了 1NF 的規則了 ! 可是這不是一個好的設計 ! 因為如果 Subject 的數量是一個不確定的數值,那麽不是要建立一堆空白的欄位來存儲資料?

要解決這個問題,我們需要把資料直向堆疊。資料表變下為以下的模樣 :

|StudentNumber|StudentName|SubjectName|Teacher|TeacherNumber|Score|
|---|---|---|---|---|---|
|001|Peter|Chinese|Mr. Chinese|t01|80|
|001|Peter|English|Mr. English|t02|91|
|002|Mary|Chinese|Mr. Chinese|t01|90|
|002|Mary|English|Mr. English|t02|77|
|003|Tom|Chinese|Mr. Chinese|t01|100|
|003|Tom|English|Mr. English|t02|55|

這樣做也是乎合了 1NF 的規則了 !

### Second normal form

Second normal form (2NF) 的規則是要每一個資料表格內的每個資料值,都要完全相依到它的主鍵 (Primary Key)。看解釋好像很難理解,看看以下實例 :

經過 1NF 的處理後我們在得到了以下的資料格式。

|StudentNumber|StudentName|SubjectName|Teacher|Score|
|---|---|---|---|---|
|001|Peter|Chinese|Mr. Chinese|80|
|001|Peter|English|Mr. English|91|
|002|Mary|Chinese|Mr. Chinese|90|
|002|Mary|English|Mr. English|77|
|003|Tom|Chinese|Mr. Chinese|100|
|003|Tom|English|Mr. English|55|

上面的資料是用來記錄考績 (Score) 的,而考績是需要主鍵 (Student + Subject) 才能完整關聯得到。相對於 Score 欄位,我們看得到 StudentName 是相依著 StudentNumber。而 Teacher 是相依著 SubjectName 的。即是只有相依到部份的欄位上,需不是完全相依到主鍵 (Student + Subject) 上。

為了要把資料變成為符合 2NF,我們需要把資料分拆成不同的資料表 :

##### Student 資料表

|StudentNumber|StudentName|
|---|---|
|001|Peter|
|002|Mary|
|003|Tom|

##### Subject 資料表

|SubjectName|Teacher|TeacherNumber|
|---|---|---|
|Chinese|Mr. Chinese|t01|
|English|Mr. English|t02|

##### Score 資料表

|StudentNumber|SubjectName|Score|
|---|---|---|
|001|Chinese|80|
|001|English|91|
|002|Chinese|90|
|002|English|77|
|003|Chinese|100|
|003|English|55|

經過 2NF 後,產生三個資料表,分別為 Student 資料表、Subject 資料表
及 Score 資料表。

### Third normal form

Third normal form (3NF) 是要把所有的遞移相依或是間接相依的資料分割出來。什麽是遞移相依? 我們看看以下資料 :

##### Subject 資料表

|SubjectName|Teacher|TeacherNumber|
|---|---|---|
|Chinese|Mr. Chinese|t01|
|English|Mr. English|t02|

TeacherNumber 是相依到 SubjectName,而 Teacher 可以相依到 TeacherNumber,這樣間 Teacher 也間接相依到 SubjectName。在這個情況就要進行 3NF 把資料從間接相依分割出來。

可以分割出下列資料表格 :

##### Subject 資料表

|SubjectName|TeacherNumber|
|---|---|
|Chinese|t01|
|English|t02|

##### Teacher 資料表

|TeacherNumber|Teacher|
|---|---|
|t01|Mr. Chinese|
|t02|Mr. English|

### 總結

經過使用 Normalization 方法,我們可以把最初的資料 :

|StudentNumber|StudentName|SubjectName|Teacher|TeacherNumber|Score|
|---|---|---|---|---|---|
|001|Peter|Chinese, English|Mr. Chinese, Mr. English|t01, t02|80, 91|
|002|Mary|Chinese, English|Mr. Chinese, Mr. English|t01, t02|90, 77|
|003|Tom|Chinese, English|Mr. Chinese, Mr. English|t01, t02|100, 55|

設計為以下的資料表 :

##### Student 資料表

|StudentNumber|StudentName|
|---|---|
|001|Peter|
|002|Mary|
|003|Tom|

##### Subject 資料表

|SubjectName|TeacherNumber|
|---|---|
|Chinese|t01|
|English|t02|

##### Teacher 資料表

|TeacherNumber|Teacher|
|---|---|
|t01|Mr. Chinese|
|t02|Mr. English|

##### Score 資料表

|StudentNumber|SubjectName|Score|
|---|---|---|
|001|Chinese|80|
|001|English|91|
|002|Chinese|90|
|002|English|77|
|003|Chinese|100|
|003|English|55|

這裡有個 PowerPoint 是台灣一所大學用來講解 Normalization 的 :

http://cc.cust.edu.tw/~ccchen/doc/db_04.pdf
### What is MD5?

The MD5 message-digest algorithm is a widely used hash function producing a 128-bit hash value.

From [Wikipedia MD5](https://en.wikipedia.org/wiki/MD5)

You can simply think that there is a function called md5(), by providing a string to that function and it will return a MD5 string to you. A MD5 string is fixed length. That means whatever how much data you input to the md5() function. The string length of output will always the same.

### How to generate MD5 string?

Different programming language has their own methods / library to generate a MD5 string.

In NodeJS, a built in module called `crypto` can help you do the staff :

```js
// import module
const crypto = require('crypto');

// input data
var data = 'hello world';

// and md5 string of 'hello world'
var md5String = crypto.createHash('md5').update(data).digest('hex');
```

There are many other digest methods that supported by `crypto` module. You can navigate to Tools page to try out the online MD5 converter.
Comments 功能是好基本的功能,因為先前使用的是由 Facebook 提供的 Comments Plugin。所以筆者沒有需要去自己處理 Comments。

不過由於這個 BLOG 也是需要自己寫功能才有意義,所以還是再弄了一個 Comments Block。

### URL 分類

也是傳統的分類方法,使用頁面的 URL 作為不同 Comment 的主鍵,這樣簡單地方不同的頁面插入同一個 Component 也可以自動分成不同頁的 Comments Block。

### 使用 Google ReCaptcha 來阻擋 Robot

在網站上填 Form 到 Database 不得不提防的是自動化的動作,一不小心你的 Database 就可以會填滿垃圾記錄,甚至可能會使網站停止運作。

Google ReCaptcha 在這方面可以為開發人員省下了不少的苦工。

Google ReCaptcha 相關資料 : https://www.google.com/recaptcha/intro/v3.html
### React 中的 Reference

Reference 是在 React 中很常會使用到的一種方法,用處是可以把引入的 HTML DOM 物件回傳出來。使用時我們會用以下的語法 :

```js

class DemoComponent extends React.Component {

	constrcutor(props) {
		// create reference object
		this.divRef = React.createRef();

		// init state
		this.state = {];
	}

	componentDidMount() {
		// print <div> in console
		console.log(this.divRef.current);
	}

	render() {
		return (<div ref={ this.divRef }>hello world</div>);
	}
}
```

當 Render 事件完成後,DOM 的物件便可以通過我們建立的 Reference 取得。然後你可以直接對物件進行 DOM 的操作。

### 只有 DOM 物件才能加入 ref

要注意的是,只有 DOM 物件才可以進行 `ref` 的操作,對於非 DOM 物件加入 `ref` 會有機會產生錯誤。

```js
// parent object render function
render() {
	return (<DemoComponent ref={this.componentRef} />);
}
```

這樣是會炒車的 !

### 提取自訂物件的 DOM ref

如果想要在自訂的 React Component 取得內裏的 DOM Reference,我們可以使用以下的 Pattern 去解決 (唔知叫什麼名稱)。

```js
// add code to component did update
componentDidUpdate() {
	// assign props
	var props = this.props;

	// check has onRef event listener
	typeof props.onRef === 'function' && props.onRef(this.divRef);
}
```

然後在 parent component 使用 component 時加入 `onRef` 事件 :

```js
// on child component return ref
onDemoComponentRef(ref) {
	this.divRef = ref;
}

// parent object render function
render() {
	return (<DemoComponent onRef={ ref => this.onDemoComponentRef(ref) } />);
}
```

這樣便可以有系統地取得自訂 Component 的 Reference。
又到了 OU 的交功課週期,這份功課已經 extends 左時間了,所以還是專心好好做好佢。因為最近工作實在太忙,加上突然又好多東西要處理,弄得心很累 ! 這個學期在 OU 報了 30 分來讀,包括有三個 10 分科。ELECS224、ELECS332 和 COMPS368 三科。感覺上 ELECS224 和 ELECS212 好像差唔多。COMPS368 就好特別,一開始頭兩課竟然是教 Routing Table !! ### DNS Iterative Resolution 這是 ELECS332 的其中一條題目的筆者自己做的答案 (交功課期已完) 在第二課 Application Layer 會教幾種常見的 Application Layer Protocol,包括有 HTTP、SMTP、DNS 等等。對於筆者這種土炮學 Programming 的人來說可是相當新奇 !! 因為自學時是用 Telnet 扮 user agent 去問 Server 拎資料,從而記錄低每個 protocol 的格式,還覺得自己 "解密" 了好利害 ! 但原來在大學裏已列印好在教科書內...... 突然發覺自己很無知。 
Base64 encode 把任何資料以一種方式轉成文字的表達,包括可以把 binary 檔案使用文定去表達出來。

以下會講解在 Javascript 上如果把文字資料轉成 Base64 encode。

### 由 Ascii 變成 Base64

```js
// encode a string
var encodedData = window.btoa('Hello, world');
```

### 由 Base64 變成 Ascii

```js
// decode the string
var decodedData = window.atob(encodedData);
```

就是這麼簡單了 !!!

但這是解決不到 unicode 的問題啦,因為只是 ascii 的轉換。要令 unicode 也可以成功轉換就要先把 unicode 的文字轉換成為 ascii 字符能夠表連出來。

###  使用 escape 及 encodeURIComponent

我們可以透過使用 escape 及 encodeURIComponent 把 unicode 文字變成為 ascii 表達出來的文字。

```js
// ucs-2 string to base64 encoded ascii
function utoa(str) {
	return window.btoa(unescape(encodeURIComponent(str)));
}

// base64 encoded ascii to ucs-2 string
function atou(str) {
	return decodeURIComponent(escape(window.atob(str)));
}
```

用以上的方法就可以把 unicode 文字轉換為 Base64 encode。

---

以下會提供一個舊舊的語法供參考 :

```js
// encode a string
var encoded = new Buffer('string data').toString('base64');

// decode a string
var decoded = new Buffer(encoded, 'base64').toString('ascii');
```
上次有一篇文章是說了 Javascript 懶人語法 (OR),這次要說的是 (OR) 的朋友 (AND)。

Javascript 的懶人語法是比較多在 React 上使用的 (可能因為寫 React 的人都比較懶)。筆者也是因為 React 才寫多了這類懶人語法。

### AND 的懶人方法

相比起 OR,AND 是當前面的條件比對完後,如果前面為非 FALSE 時,就會進行第二個條件比對,一直下去。例如 :

```js
// statement 1
1 * 0 || 2 + 1;

// statement 2
3 + 1 && 2 * 0 && 2 + 2;
```

上面 Statement 1 時,JS 會以以下流程執行 :

1.	1 * 0 = 0

2.	0 即是 false

3.	OR 會繼續執行下一個 condition,直至全部完成或是遇上非 false

4.	2 + 1 = 3

5.	3 即是非 false

6.	完成執行

上面 Statement 2 時,JS 會以以下流程執行 :

1.	3 + 1 = 4

2.	4 即是非 false

3.	AND 會繼續執行下一個 condition,直至全部完成或是遇上 false

4.	2 * 0 = 0

5.	0 即是 false

6.	完成執行

(會 Skip 了 2 + 2 的 condition)

### 特性

OR 的特性可以用來使用於 Assign :

```js
const getInt = i => {
	return i || 1;
]
```

而 AND 的特性是可以使用於 Execute:

```js
const getInt = (i, callback) => {
	typeof callback === 'function' && callback(i || 1);
}
```
最近在 build react project 時常常會發生這個問題,build 了後久也沒有回應,然後就會跳出一個 Error 137 出來。

在網路上爬了一會發覺原來是因為系統的 memory 不足夠,所會才會出現如此 Error,立時想起運得的環境是在 1 CPU 512 RAM 的 VPS 上 build .....

其他人提及到問題的相關的網址 : https://github.com/hackmdio/codimd/issues/1254
### Google AdSense 是什麼? Google AdSense 是一個廣告的平台,可以在那裡下廣告。而網站的制作人如果想在你的網站上放入廣告來提升收入,這個平台也可以把廣告分發到第三方的網站上刊登。 ### 不是教大家申請 這個文章不是要教大家如何申請 AdSense,而想講的是這個 19Site (到現時為止) 的 AdSense 申請又被 Block 下來了 !! 雖然也是意料中的事情呢,因為這個 Blog 實在沒有什麼內容可以顯示。  在日後的日子會慢慢的加入新的內容,總有一天可以試試這個功能。
今日都係要繼續了解 Google Admin SDK 如何使用。

暫時得出的結果是先要 Request [Domain](https://developers.google.com/admin-sdk/directory/v1/reference/domains) 為 OAuth2 後的第一個動作。

這個 Request 會回傳自己帳戶內的所有 doamins 記錄 (正常每一個 Google GSuite 帳戶不是只會有一個 Domain 的嗎 )。

而當你讀取記錄時就可以取得你當前帳戶的 Domain 名稱。

這個 Domain 名稱在抽取使用者時是需要填入的。

### 讀取 Domain 資料

首先使用以下的方法取得 Domain 資料

> GET https://www.googleapis.com/admin/directory/v1/customer/my_customer/domains

### 讀取 User 資料

回傳的 JSON 可以得到 Domains 列表,然後當使用取得 User data 的 Rest 時,便可以把上面取得的 Domain 名稱填入到下面的連結 :

> GET https://www.googleapis.com/admin/directory/v1/users?domain=testingdomain.com

這樣便可以正確取得資料
今天講一下 React 的 Props。

在 React 中我們會常常使用到 props 來傳遞資料,把父系的資料傳送到子系的物件上。需我們在物件上收 props 通常會是以下的格式 :

```js
// 例子 1 (直接使用 function 來建立 element)
const ReactElement = props => {

	// extract props elements
	var { style, children } = this.props;

	// render
	return (
		<div style={ ...style }>
			{ children }
		</div>
	);
};

// 例子 2 (使用 class 的方法建立 element)
class ReactElement extends React.Component {
	constructor(props) {
		super(props);
	}

	render() {

		// extract props elements
		var { style, children } = this.props;

		// render
		return  (
			<div style={ ...style }>
				{ children }
			</div>
		);
	}
}
```

在例子 2 的情況下,筆者最近多了一個習慣,使用在存取 props 時更能預測資料的預定值。如下:

```js
getProps(props) {

	// set input object
	props = props || this.props;

	// return props values
	return {

		// check and set default value for style
		style: typeof props.style === 'object'? props.style: {},

		// check and set default value for children
		children: typeof props.children === 'object' && Array.isArray(props.children)? props.children: []
	};
}
```

使用以上的方法,當你在抽取要使用 props 的資料時,便可以機乎確定所使用的資料是在你的預測範圍內,以減少發生錯誤的可能性。

```js
var { style, children } = this.getProps();
```

在可以用於 componentDidUpdate 的情況

```js
componentDidUpdate(oldProps) {
	var oP = self.getProps(oldProps);
	var cP = self.getProps();
}
```

當然如果正統來說是使用 PropType 和 defaultProps 較為好。

相關文件 : https://zh-hant.reactjs.org/docs/typechecking-with-proptypes.html
> Original URL: http://www.branbibi.com/blog/s.php?n=english-words&tid=Do_you_%E8%88%87_Are_you_%E7%9A%84%E7%94%A8%E6%B3%95%E5%B7%AE%E7%95%B0

Do you 與 Are you 的用法差異是許多剛開始學英文的朋友經常搞不清楚的問題,其實無論是 Do you 還是 Are you 都是疑問句的開頭,舉例來說,英文的"Do you want to go with me?"這句是詢問對方"你要不要跟我去?"的意思。

再來看"Are you married?"這句片語是詢問對方是否已經結婚,當你要詢問對方的時候可能會使用 Do you 開頭,也可能會使用 Are you 開頭,這兩者在使用上有一些文法上的區別。

### Do you 開頭的疑問句

用 Do you 開頭的疑問句後麵必須接原形動詞(verb)或副詞(adverb),因為 Do 的關係,以下是一些 Do you 開頭的疑例句。

-	Do you like me? → 你喜歡我嗎?

-	Do you love me? → 你愛我嗎?

-	Do you speak english? → 你會說英語嗎?

-	Do you like your job? → 你喜歡你的工作嗎?

-	Do you really love me? → 你真的愛我嗎?

-	Do you really want to know? → 你真的想知道?

-	Do you really think so? →你真得這樣想嗎?

### Are You 開頭的疑問句

用 Are you 開頭的疑問句後麵可以接的東西就多了,包含介詞(preposition)、代名詞(pronouns)、副詞(adverb)、形容詞(adjective)都可以,不過不能接原形動詞,以下是一些 Are you 開頭的疑問句。

-	Are you there? → 你在嗎?

-	Are you sure? → 你確定嗎?

-	Are you hungry? → 你餓了嗎?

-	Are you tired? → 你累了嗎?

-	Are you going to work today? → 你今天會去上班嗎?

-	Are you busy? → 你在忙嗎?
> 版權聲明:本文為CSDN博主「碼農翻身」的原創文章,遵循 CC 4.0 BY-SA 版權協議,轉載請附上原文出處鏈接及本聲明。

> 原文鏈接:https://blog.csdn.net/coderising/article/details/101731213

這是來自我的星球的一個提問:“C語言本身用什麼語言寫的?”

換個角度來問,其實是:C語言在運行之前,得編譯才行,那C語言的編譯器從哪裏來? 用什麼語言來寫的?如果是用C語言本身來寫的,到底是先有蛋還是先有雞?

### 1. 我們假設世界上不存在任何編譯器, 先從機器語言說起,看看怎麼辦。

機器語言可以直接被CPU執行,不需要編譯器。

然後是彙編語言, 彙編語言雖然隻是機器語言的助記符,但是也需要編譯成機器語言才能執行,沒辦法隻能用機器語言來寫這第一個編譯器了(以後就不用了)。

彙編語言的問題解決了,就往前邁進了一大步,這時候就可以用彙編語言去寫C語言的編譯器,我們說這是C編譯器的老祖宗。

有了這個老祖宗,就可以編譯任意的C語言程序了,那是不是可以用C語言本身寫一個編譯器?隻要用老祖宗編譯一下就可以了。

OK, 這麼一層層上來,終於得到了一個用C語言寫的編譯器, 真是夠麻煩的。

到這個時候,之前那個彙編寫的C語言編譯器就可以拋棄了。

當然,如果在C語言之前,已經出現了別的高級語言,例如Pascal,那就可以用Pascal來寫一個C語言的編譯器。

第一個Pascal的編譯器據說使用Fortran寫的。而做為第一個高級語言的Fortran,它的編譯器應該是彙編語言寫的。

### 2. 關於編譯器,這裏邊有個有趣的傳說:

傳說Unix 發明人之一的 Ken Thompson在貝爾實驗室,大搖大擺的走到任何一台Unix機器前,輸入自己的用戶名和密碼,就能以root的方式登錄!

貝爾實驗室人才濟濟,另外一些大牛發誓要把這個漏洞找出來,他們通讀了Unix的C源碼,終於找到了登錄的後門, 清理後門以後編譯Unix , 運行, 可是Thompson 還是能夠登錄進去。

有人覺得可能是編譯器中有問題,在編譯Unix的時候植入了後門, 於是他們又用C語言重新寫了一個編譯器,用新的編譯器再次編譯了Unix, 這下總算天下太平了吧。

可是仍然不管用, Thompson 依然可以用root登錄,真是讓人崩潰 !

後來Thompson 本人解開了秘密,是第一個C 語言編譯器有問題, 這個編譯器在編譯Unix源碼的時候,當然會植入後門, 這還不夠,更牛的是,如果你用C 語言寫了一個新編譯器,肯定也需要編譯成二進製代碼啊,用什麼來編譯,隻有用Thompson寫的那第一個編譯器來編譯,好了, 你寫的這個編譯器就會被汙染了,你的編譯器再去編譯Unix , 也會植入後門 :-)

說到這裏我就想起了幾年前的XcodeGhost 事件,簡單來說就是在Xcode(非官方渠道下載的)中植入了木馬,這樣XCode編譯出的ios app都被汙染了,這些app就可以被黑客利用做非法之事。

雖然這個XCodeGhost和Thompson的後麵相比差得遠,但是提醒我們,下載軟件的時候要走正規渠道,從官方網站下載,認準網站的HTTPS標準,甚至可以驗證一下checksum。

### 3. 可能有人問:我用彙編寫一段Hello World都很麻煩,居然有人可以用它寫複雜的編譯器?這可能嗎?

當然可能,在開發第一代Unix的時候,連C語言都沒有, Ken Thompson 和 Dennis Ritchie 可是用彙編一行行把Unix敲出來的。   WPS第一版是求伯君用彙編寫出來的, Turbo Pascal 的編譯器也是Anders 用彙編寫出來的,大神們的能力不是普通人能想象得到的。

對於編譯器來說,還可以采用“滾雪球”的方式來開發:

還是以C語言為例,第一個版本可以先選擇C語言的一個子集,例如隻支持基本的數據類型,流程控製語句,函數調用...... 我們把這個子集稱為C0。

然後用彙編語言寫個編譯器,隻搞定這個語言的子集C0,這樣寫起來就容易不少。

C0這個語言可以工作了,然後我們擴展這個子集,例如添加struct,指針......  ,把新的語言稱為C1。

那C1這個語言的編譯器由誰來寫?   自然是C0。

等到C1可以工作了,再次擴展語言特性,用C1寫編譯器,得到C2。

然後是C3, C4......  最後得到完整的C語言。

這個過程被稱為bootstraping , 中文叫做自舉。
> Original URL : https://www.lucidchart.com/pages/database-diagram/database-design With a reliable database design tool like Lucidchart, a well-designed database gives users access to essential information. By following the principles on this page, you can design a database that performs well and adapts to future needs. We’ll cover the basics of laying out a database as well as ways to refine it for optimal results. ### The database design process A well-structured database: - Saves disk space by eliminating redundant data. - Maintains data accuracy and integrity. - Provides access to the data in useful ways. Designing an efficient, useful database is a matter of following the proper process, including these phases: 1. Requirements analysis, or identifying the purpose of your database 2. Organizing data into tables 3. Specifying primary keys and analyzing relationships 4. Normalizing to standardize the tables Let’s take a closer look at each step. Note that this guide deals with Edgar Codd’s relational database model as written in SQL (rather than the hierarchical, network, or object data models). To learn more about database models, read our guide here. ### Requirements analysis: identifying the purpose of the database Understanding the purpose of your database will inform your choices throughout the design process. Make sure you consider the database from every perspective. For instance, if you were making a database for a public library, you’d want to consider the ways in which both patrons and librarians would need to access the data. Here are some ways to gather information before creating the database: - Interview the people who will use it - Analyze business forms, such as invoices, timesheets, surveys - Comb through any existing data systems (including physical and digital files) Start by gathering any existing data that will be included in the database. Then list the types of data you want to store and the entities, or people, things, locations, and events, that those data describe, like this: Customers - Name - Address - City, State, Zip - Email address Products - Name - Price - Quantity in stock - Quantity on order Orders - Order ID - Sales representative - Date - Product(s) - Quantity - Price - Total This information will later become part of the data dictionary, which outlines the tables and fields within the database. Be sure to break down the information into the smallest useful pieces. For instance, consider separating the street address from the country so that you can later filter individuals by their country of residence. Also, avoid placing the same data point in more than one table, which adds unnecessary complexity. Once you know what kinds of data the database will include, where that data comes from, and how it will be used, you’re ready to start planning out the actual database. ### Database structure: the building blocks of a database The next step is to lay out a visual representation of your database. To do that, you need to understand exactly how relational databases are structured. Within a database, related data are grouped into tables, each of which consists of rows (also called tuples) and columns, like a spreadsheet. To convert your lists of data into tables, start by creating a table for each type of entity, such as products, sales, customers, and orders. Here’s an example: Each row of a table is called a record. Records include data about something or someone, such as a particular customer. By contrast, columns (also known as fields or attributes) contain a single type of information that appears in each record, such as the addresses of all the customers listed in the table. |First Name|Last Name|Age|ZIP Code| |---| |Roger|Williams|43|34760| |Jerrica|Jorgensen|32|97453| |Samantha|Hopkins|56|64829| To keep the data consistent from one record to the next, assign the appropriate data type to each column. Common data types include: - CHAR - a specific length of text - VARCHAR - text of variable lengths - TEXT - large amounts of text - INT - positive or negative whole number - FLOAT, DOUBLE - can also store floating point numbers - BLOB - binary data Some database management systems also offer the Autonumber data type, which automatically generates a unique number in each row. For the purposes of creating a visual overview of the database, known as an entity-relationship diagram, you won’t include the actual tables. Instead, each table becomes a box in the diagram. The title of each box should indicate what the data in that table describes, while attributes are listed below, like this:  Finally, you should decide which attribute or attributes will serve as the primary key for each table, if any. A primary key (PK) is a unique identifier for a given entity, meaning that you could pick out an exact customer even if you only knew that value. Attributes chosen as primary keys should be unique, unchanging, and always present (never NULL or empty). For this reason, order numbers and usernames make good primary keys, while telephone numbers or street addresses do not. You can also use multiple fields in conjunction as the primary key (this is known as a composite key). When it comes time to create the actual database, you’ll put both the logical data structure and the physical data structure into the data definition language supported by your database management system. At that point, you should also estimate the size of the database to be sure you can get the performance level and storage space it will require. ### Creating relationships between entities With your database tables now converted into tables, you’re ready to analyze the relationships between those tables. Cardinality refers to the quantity of elements that interact between two related tables. Identifying the cardinality helps make sure you’ve divided the data into tables most efficiently. Each entity can potentially have a relationship with every other one, but those relationships are typically one of three types: #### One-to-one relationships When there’s only one instance of Entity A for every instance of Entity B, they are said to have a one-to-one relationship (often written 1:1). You can indicate this kind of relationship in an ER diagram with a line with a dash on each end:  Unless you have a good reason not to, a 1:1 relationship usually indicates that you’d be better off combining the two tables’ data into a single table. However, you might want to create tables with a 1:1 relationship under a particular set of circumstances. If you have a field with optional data, such as “description,” that is blank for many of the records, you can move all of the descriptions into their own table, eliminating empty space and improving database performance. To guarantee that the data matches up correctly, you’d then have to include at least one identical column in each table, most likely the primary key. #### One-to-many relationships These relationships occur when a record in one table is associated with multiple entries in another. For example, a single customer might have placed many orders, or a patron may have multiple books checked out from the library at once. One-to-many (1:M) relationships are indicated with what’s called “Crow’s foot notation,” as in this example:  To implement a 1:M relationship as you set up a database, simply add the primary key from the “one” side of the relationship as an attribute in the other table. When a primary key is listed in another table in this manner, it’s called a foreign key. The table on the “1” side of the relationship is a considered a parent table to the child table on the other side. #### Many-to-many relationships When multiple entities from a table can be associated with multiple entities in another table, they are said to have a many-to-many (M:N) relationship. This might happen in the case of students and classes, since a student can take many classes and a class can have many students. In an ER diagram, these relationships are portrayed with these lines:  Unfortunately, it’s not directly possible to implement this kind of relationship in a database. Instead, you have to break it up into two one-to-many relationships. To do so, create a new entity between those two tables. If the M:N relationship exists between sales and products, you might call that new entity “sold_products,” since it would show the contents of each sale. Both the sales and products tables would have a 1:M relationship with sold_products. This kind of go-between entity is called a link table, associative entity, or junction table in various models. Each record in the link table would match together two of the entities in the neighboring tables (it may include supplemental information as well). For instance, a link table between students and classes might look like this:  #### Mandatory or not? Another way to analyze relationships is to consider which side of the relationship has to exist for the other to exist. The non-mandatory side can be marked with a circle on the line where a dash would be. For instance, a country has to exist for it to have a representative in the United Nations, but the opposite is not true:  Two entities can be mutually dependent (one could not exist without the other). #### Recursive relationships Sometimes a table points back to itself. For example, a table of employees might have an attribute “manager” that refers to another individual in that same table. This is called a recursive relationship. #### Redundant relationships A redundant relationship is one that is expressed more than once. Typically, you can remove one of the relationships without losing any important information. For instance, if an entity “students” has a direct relationship with another called “teachers” but also has a relationship with teachers indirectly through “classes,” you’d want to remove the relationship between “students” and “teachers.” It’s better to delete that relationship because the only way that students are assigned to teachers is through classes. ### Database normalization Once you have a preliminary design for your database, you can apply normalization rules to make sure the tables are structured correctly. Think of these rules as the industry standards. That said, not all databases are good candidates for normalization. In general, online transaction processing (OLTP for short) databases, in which users are concerned with creating, reading, updating, and deleting records, should be normalized. Online analytical processing (OLAP) databases which favor analysis and reporting might fare better with a degree of denormalization, since the emphasis is on speed of calculation. These include decision support applications in which data needs to be analyzed quickly but not changed. Each form, or level of normalization, includes the rules associated with the lower forms. #### First normal form The first normal form (abbreviated as 1NF) specifies that each cell in the table can have only one value, never a list of values, so a table like this does not comply: |ProductID|Color|Price| |---| |1|brown, yellow|$15| |2|red, green|$13| |3|blue, orange|$11| You might be tempted to get around this by splitting that data into additional columns, but that’s also against the rules: a table with groups of repeated or closely related attributes does not meet the first normal form. The table below, for example, fails to comply:  Instead, split the data into multiple tables or records until each cell holds only one value and there are no extra columns. At that point, the data is said to be atomic, or broken down to the smallest useful size. For the table above, you could create an additional table called “Sales details” that would match specific products with sales. “Sales” would then have a 1:M relationship with “Sales details.” #### Second normal form The second normal form (2NF) mandates that each of the attributes should be fully dependent on the entire primary key. That means each attribute should depend directly on the primary key, rather than indirectly through some other attribute. For instance, an attribute “age” that depends on “birthdate” which in turn depends on “studentID” is said to have a partial functional dependency, and a table containing these attributes would fail to meet the second normal form. Furthermore, a table with a primary key made up of multiple fields violates the second normal form if one or more of the other fields do not depend on every part of the key. Thus, a table with these fields wouldn’t meet the second normal form, because the attribute “product name” depends on the product ID but not on the order number: - Order number (primary key) - Product ID (primary key) - Product name #### Third normal form The third normal form (3NF) adds to these rules the requirement that every non-key column be independent of every other column. If changing a value in one non-key column causes another value to change, that table does not meet the third normal form. This keeps you from storing any derived data in the table, such as the “tax” column below, which directly depends on the total price of the order: |Order|Price|Tax| |---| |14325|$40.99|$2.05| |14326|$13.73|$.69| |14327|$24.15|$1.21| Additional forms of normalization have been proposed, including the Boyce-Codd normal form, the fourth through sixth normal forms, and the domain-key normal form, but the first three are the most common. While these forms explain the best practices to follow generally, the degree of normalization depends on the context of the database. ### Multidimensional data Some users may want to access multiple dimensions of a single type of data, particularly in OLAP databases. For instance, they may want to know the sales by customer, state, and month. In this situation, it’s best to create a central fact table that other customer, state, and month tables can refer to, like this:  ### Data integrity rules You should also configure your database to validate the data according to the appropriate rules. Many database management systems, such as Microsoft Access, enforce some of these rules automatically. The entity integrity rule says that the primary key can never be NULL. If the key is made up of multiple columns, none of them can be NULL. Otherwise, it could fail to uniquely identify the record. The referential integrity rule requires each foreign key listed in one table to be matched with one primary key in the table it references. If the primary key changes or is deleted, those changes will need to be implemented wherever that key is referenced throughout the database. Business logic integrity rules make sure that the data fits within certain logical parameters. For instance, an appointment time would have to fall within normal business hours. ### Adding indexes and views An index is essentially a sorted copy of one or more columns, with the values either in ascending or descending order. Adding an index allows users to find records more quickly. Instead of re-sorting for each query, the system can access records in the order specified by the index. Although indexes speed up data retrieval, they can slow down inserting, updating, and deleting, since the index has to be rebuilt whenever a record is changed. A view is simply a saved query on the data. They can usefully join data from multiple tables or else show part of a table. ### Extended properties Once you have the basic layout completed, you can refine the database with extended properties, such as instructional text, input masks, and formatting rules that apply to a particular schema, view, or column. The advantage is that, because these rules are stored in the database itself, the presentation of the data will be consistent across the multiple programs that access the data. ### SQL and UML The Unified Modeling Language (UML) is another visual way of expressing complex systems created in an object-oriented language. Several of the concepts mentioned in this guide are known in UML under different names. For instance, an entity is known as a class in UML. UML is not used as frequently today as it once was. Today, it is often used academically and in communications between software designers and their clients. ### Database management systems Many of the design choices you will make depend on which database management system you use. Some of the most common systems include: - Oracle DB - MySQL - Microsoft SQL Server - PostgreSQL - IBM DB2 When given the choice, pick an appropriate database management system based on cost, operating systems, features, and more.
##### Google Cloud Platform

https://console.cloud.google.com

##### OAuth2 相關資料

https://developers.google.com/identity/protocols/OAuth2

##### OAuth2 Service Account 相關資料

https://developers.google.com/identity/protocols/OAuth2ServiceAccount

##### OAuth2 的可用 Scopes

https://developers.google.com/identity/protocols/googlescopes

##### 您的戶口 API 存取權限管理

https://myaccount.google.com/u/0/permissions?pli=1

##### Google Admin SDK Directory API 參考

https://developers.google.com/admin-sdk/directory/v1/reference

##### Perform G Suite Domain-Wide Delegation of Authority

https://developers.google.com/admin-sdk/directory/v1/guides/delegation

##### Google Calendar API

https://developers.google.com/calendar/v3/reference
### 修改 ROOT 使用者密碼

可以使用以下的 Command :

```sh
mysql > grant all privileges on *.* to 'root'@'localhost';

mysql > alter user 'root'@'localhost' identified by 'your-password';

mysql > update mysql.user set plugin = 'mysql_native_password' where host = 'localhost' and user = 'root';

mysql > flush privileges;
```
今天又搞一陣,因為忙記了怎樣可以把 PHP-FPM 設定為在 PORT 9000 上行。弄到遲了下班 !! 現在先記錄下來,日後必定要不可以重覆犯錯 !!

```sh
sudo vi /etc/php/7.x/fpm/pool.d/www.conf
```

記得記得修改這個檔案 !!!

```sh
[www]
listen = 0.0.0.0:9000
```

修改以上的部份後,在 NGINX 設定好後就可以使用 PHP 了 !!!
在 Javascript 上有好多懶人語法, 以下會介紹在 React 中比較常見到的 OR 語法 :

### OR 語法

```js
const addByOne = a => {
	a = a || 0;
	return ++a;
};
```
這裡的 OR 是指如果 a 的條件為 fail 時,就會把 0 assign 到 a。

但如果 a 是條件為非 fail 時,就會把 a assign 到 a。

```js
console.log(addByOne());
// 1

console.log(addByOne(1));
// 2

console.log(addByOne(addByOne(1)));
// 3
```
The following steps are to completely remove MySQL from your machine:

```sh
sudo apt-get remove --purge mysql*

sudo apt-get purge mysql*

sudo apt-get autoremove

sudo apt-get autoclean

sudo apt-get remove dbconfig-mysql

sudo apt-get dist-upgrade

sudo apt-get install mysql-server
```
> Original URL : https://support.comodo.com/index.php?/Knowledgebase/Article/View/684/17/how-do-i-verify-that-a-private-key-matches-a-certificate-openssl

How do I verify that a private key matches a certificate?

To verify that an RSA private key matches the RSA public key in a certificate you need to i) verify the consistency of the private key and ii) compare the modulus of the public key in the certificate against the modulus of the private key.

To verify the consistency of the RSA private key and to view its modulus:

```sh
openssl rsa -modulus -noout -in myserver.key | openssl md5
```

```sh
openssl rsa -check -noout -in myserver.key | openssl md5
```

RSA Key is ok

If it doesn't say 'RSA key ok', it isn't OK!"

To view the modulus of the RSA public key in a certificate:

```sh
openssl x509 -modulus -noout -in myserver.crt | openssl md5
```

If the first commands shows any errors, or if the modulus of the public key in the certificate and the modulus of the private key do not exactly match, then you're not using the correct private key.  You can either create a brand new key and CSR and contact support, or you can do a search for any other private keys on the system and see if they match.

To search for all private keys on your server:

```sh
find / -name *.key
```
今天是行程的第五天,這天主要在池袋玩 VR。 早上起來的時候已經不早了,我們先到池袋車站,由西口走向東口。 東口那邊的食店比較多。行行逛逛,找到了一家有燒肉放題的餐館。午餐3000多日元就可以吃到了放題,看到後我們便進去了。 吃過午餐後,我們便到了 Sunshine City。  對 Sunshine City 的印象,是有一家店專賣史努比用品的。那邊的商場比較像商業中心,初初也迷路了。後來在升降機的大堂側,找到了商場的入口。 那個商場很大,有很多遊客,也有很多賣少女服飾的店。太太看到當然要閑逛一番。 裏面有一家店是賣迪士尼玩具及精品的,有一隻超巨型的維尼熊。維尼熊是望向門口的,突然太太大叫了一聲。你看看那邊。然後筆者便望向太太指著的方向,看到那隻巨型小熊維尼,正在向我們揮手。嚇得我目定口呆。屌你老味原來有個女職員喺後面,玩緊佢隻手。非常搞笑。  再走到三樓處,在最裏面的地方,我們看到了一家,沒有開燈的店鋪。那店舖像是給兒童遊玩的兒童遊樂園。店面的面積是超巨大的。 在四樓的相同地方我們看到了一所 VR 電玩中心。和太太商量了一會之後,決定進去看看。在詢問價格後,就去到門票處準備買票。在那裏有位女店員,原來是從香港來的。在異地能聽到廣東話真的很親切。她介紹我們買最貴的套票,因為最貴的套票可以玩足所有遊戲,如果時間許可是十分值得的。 對於今天沒有什麼景點跑的我們來講。是一個非常合適的時光。4100日元 1 位。 場內真的有很多不同的電玩遊戲。有孖寶賽車,食鬼,高爾夫球,密室逃脫,哥斯拉,高達,等等。當中孖寶賽車及哥師奶是非常好玩的。  其中有一個是要逃脫密室的,叫作逃脫病棟。那個遊戲是玩家坐在一張輪椅上,然後你手上祇有一支電筒,你便要和其它的玩家協作。一起選擇正確的路然後逃出醫院。途中會有很多已變成喪屍的醫護人員出來嚇你。非常驚嚇但也十分搞笑。 另外有一個遊戲,是玩家乘坐在吉普車上,拿著槍對付喪屍。筆者和太太分別坐在吉普車的前座左右,各拿手槍面向喪屍。遊戲的目的是不能被喪屍碰到,如果喪屍碰到你的身體便會遊戲失敗。 在遊戲中途有大量的喪屍從筆者那邊跑出來,然後瘋狂被爪數十下我看那時已經命喪在車子上了,但是喪屍找了我之後卻沒有立即把我變成喪屍。慢慢喪屍便被我一隻一隻擊殺,此時我看到太太的那邊是沒有喪屍走出來的。我在驚訝著為什麼太太那邊那麼易玩。 然後劇情繼續下去,是吉普車會墮入一個黑洞之中。躲進去後我看到吉普車的司機已經死了。然後我望向太太的方向,他的牙已經變成尖,而且手還有鮮血皮膚變成紫色,那時我確定她已經變成喪屍了。不出一會,他便醒來然後,撲向我瘋狂地咬。我的遊戲便輸了。 當我除眼罩後還怪責太太沒有打好喪屍類他變成喪屍然後咬死我。但原來在他的遊戲內他是勝出了,三人也不能夠成功逃脫。然後我問他,你不是那邊沒有喪屍嗎。他對我說你那邊才沒有喪屍他那邊的喪屍是超多的。我才知道原來每個玩家換的也是獨立故事。 遊戲實在太多了,沒有逐一把它們玩完便要離開。那時已經差不多晚上十時,遊戲也要關機了。我們回到商場內,大部份的店鋪已經落閘。我們的肚子也餓得發出聲響了。 離開店舖後便出發找吃的東西,在東口的商場實在太多夾公仔店舖了。當然太太又忍不住,去夾了兩隻角落生物回來。使用了500日元。 在東口一直行我們到了一家在地底的居酒屋。這家居酒屋,先前太太在旅遊書有介紹過說東西很不錯價錢也便宜,所以我們便決定進食。這次我們拍了很多照片。      吃過晚飯後已經夜深了,在池袋的街頭依然是非常多人,但感覺比名古屋好像安全得多,起碼沒有一群群的人在街角吸煙。 很快便回到飯店休息,這天行程完結。
今天是行程的第四天,因為今天有會朋友先回家的關係,而她乘坐的 NEX 開出地點是新宿站,所以今天我們會到新宿走走。 像我這種年齡的香港人對新宿的印象大概會記得的是成龍的電影 '新宿事件'。那套電影的主要場景就是日本東京的新宿區,有關歌舞技町的黑幫事件。  今天親身來到新宿可是看不到當年電影內的氣氛,只是感覺到熱熱的氣天及滿滿行人。  行了一會吃過午餐後就到了夾公仔店去瘋狂夾公仔了 !!! 已經過了不知多久,朋友的 NEX 時間也差不多到了。我們先回到新宿站找回寄放行李的 LOCKER 再去乘車。 可怕的事情發生了 !! 就是找不到寄放行季的地方,找了很久也找不到。結果朋友說她自己行季便好。最後她自己找到了呢 !! 十分利害。(新宿的車站真的超級大及很多鐵路交匯) 和她分別後筆者和太太便在新宿站乘 JR 到秋葉原站,準備去血併一番。  這裡的 SEGA 店真是超大規模的,有分為 1 2 3 4 5 座,每坐都會有 4-5層。有夾公仔的,也有是街機遊戲。  行了幾家館已經用了很多氣力。晚餐在一號館旁邊有一所在地下 B1 的餐館用餐,進去那時候時間還早 ( 大約 6 時 ),那時候沒有人在排隊,但在出餐館時已經有十多人在門外排隊 !! 店家弄的東西十分好吃,是鐵板牛肉飯 (忘記了拍照)。 吃飽後再走一會就乘坐 JR 回池袋了,真的很累。
### TL;DR Please visit: https://www.sslforfree.com  ### SSL Nowadays an SSL certification for your web site is a must. And now you may not pay for an SSL certificate for your web site. With SSL For Free, it will generate a valid SSL certificate for your domain name. Even Wildcard SSL Certificates are also free. Steps are easy: 1. Go to https://www.sslforfree.com 2. Enter your domain name into the text input field 3. Hit 'Create Free SSL Certificate' 4. There are three types of domain validation method : - Automatic FTP Verification - Manual Verification - Manual Verification (DNS) Choose any one of them to verify the domain name is owned by you. 5. Finally, an SSL certificate will issue. 6. Install the SSL certificate to your web application server.
來到行程的第三日,今日會去到東京最多人 (筆者覺得最多人) 的地方,原宿和涉谷。 因為實在太多人的關係,所以連相都沒有拍太多,主要是到了城市中的一個城堡! 明治神宮 明治神宮的介紹 : https://tokyo.letsgojp.com/archives/52391 我們由池袋坐 JR 到原宿站,由南口出站先到表參道行一圈。那邊都要商場及賣場等等。一定能夠滿足女士的行街需要。 先後就開始向明治神宮出發。  這裡超多人在拍照,因為那天天氣實在太熱了。在一大片的陽光下地面的溫度非常高,在有大量樹陰的小型森林中特別涼快。   有個外國的旅行團來拍照。 這個鳥居真的非常的大,那個木柱大約要 3-4 個成年人手拉手才能環抱。       之後去的地方實在太像太多人,所以沒有拍太多照了。
> 原文網址 : https://www.vpsee.com/2010/08/block-traffic-from-a-specific-country-using-iptables/
星期六我們一位客戶受到攻擊,我們的網絡監測顯示有連續6小時的巨大異常流量,我們立即聯係了客戶,沒有得到回應,我們修改和限製了客戶的 VPS,使得個別 VPS 受攻擊不會對整個服務器和其他 VPS 用戶造成任何影響,我們一直保持這個 VPS 為開通狀態(盡管一直受攻擊),攻擊又持續了24小時,星期天攻擊仍在繼續,我們忍無可忍,但是仍然無法聯係到客戶,我們向客戶網站的另一負責人詢問是否需要我們介入來幫助解決,這位負責人答應後我們立即投入到與 DDoS 的戰鬥中(我們動態掃描屏蔽壞 IP,現在客戶網站已恢複。整個過程很有意思,以後有時間再寫一篇博客來描述)。登錄到客戶 VPS 第一件事情就是查當前連接和 IP,來自中國的大量 IP 不斷侵占80端口,典型的 DDoS. 所以第一件事是切斷攻擊源,既然攻擊隻攻80端口,那有很多辦法可以切斷,直接關閉網站服務器、直接用防火牆/iptables 切斷80端口或者關閉所有連接、把 VPS 網絡關掉、換一個 IP,⋯,等等。因為攻擊源在國內,所以我們決定切斷來自國內的所有訪問,這樣看上去網站好像是被牆了而不是被攻擊了,有助於維護客戶網站的光輝形象:D,那麼如何屏蔽來自某個特定國家的 IP 呢?
方法很容易,先到 [IPdeny](http://www.ipdeny.com/ipblocks) 下載以國家代碼編製好的 IP 地址列表,比如下載 cn.zone:
```sh
# wget http://www.ipdeny.com/ipblocks/data/countries/cn.zone
```
有了國家的所有 IP 地址,要想屏蔽這些 IP 就很容易了,直接寫個腳本逐行讀取 cn.zone 文件並加入到 iptables 中:
```sh
#!/bin/bash
# Block traffic from a specific country
# written by vpsee.com
COUNTRY="cn"
IPTABLES=/sbin/iptables
EGREP=/bin/egrep
if [ "$(id -u)" != "0" ]; then
echo "you must be root" 1>&2
exit 1
fi
resetrules() {
$IPTABLES -F
$IPTABLES -t nat -F
$IPTABLES -t mangle -F
$IPTABLES -X
}
resetrules
for c in $COUNTRY
do
country_file=$c.zone
IPS=$($EGREP -v "^#|^$" $country_file)
for ip in $IPS
do
echo "blocking $ip"
$IPTABLES -A INPUT -s $ip -j DROP
done
done
exit 0
```
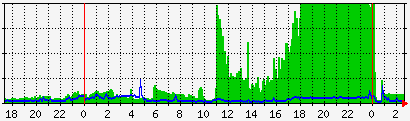
好 IP 和壞 IP 都被屏蔽掉了,這種辦法當然不高明,屏蔽 IP 也沒有解決被攻擊的問題,但是是解決問題的第一步,屏蔽了攻擊源以後我們才有帶寬、時間和心情去檢查 VPS 的安全問題。公布一份我們客戶被攻擊的網絡流量圖,在18點到0點所有帶寬都被攻擊流量占用,這時候客戶無法登錄 VPS,訪問者也無法訪問網站:
> 原文網址 : https://gitbook.tw/chapters/gitflow/why-need-git-flow.html 當在同一個專案一起開發的人數越來越多,如果沒有訂好規矩,每個人的 Commit 習慣可能都不同,放任大家隨便 Commit 的話遲早會造成災難。 在 2010 年的時候,就有人提出了一套流程,或說是訂了一套規矩讓大家可以遵守: 網址:http://nvie.com/posts/a-successful-git-branching-model 不過因為這套流程是 2010 年提出的,到現在也已經九年了,這幾年來也陸續有其它優秀的開發流程,例如 GitHub Flow、Gitlab Flow 等流程,我們這邊僅以 Git Flow 做為介紹。 ### 分支應用情境 根據 Git Flow 的建議,主要的分支有 master、develop、hotfix、release 以及 feature 這五種分支,各種分支負責不同的功能。其中 Master 以及 Develop 這兩個分支又被稱做長期分支,因為他們會一直存活在整個 Git Flow 裡,而其它的分支大多會因任務結束而被刪除。  ### Master 分支 主要是用來放穩定、隨時可上線的版本。這個分支的來源只能從別的分支合併過來,開發者不會直接 Commit 到這個分支。因為是穩定版本,所以通常也會在這個分支上的 Commit 上打上版本號標籤。 ### Develop 分支 這個分支主要是所有開發的基礎分支,當要新增功能的時候,所有的 Feature 分支都是從這個分支切出去的。而 Feature 分支的功能完成後,也都會合併回來這個分支。 ### Hotfix 分支 當線上產品發生緊急問題的時候,會從 Master 分支開一個 Hotfix 分支出來進行修復,Hotfix 分支修復完成之後,會合併回 Master 分支,也同時會合併一份到 Develop 分支。 為什麼要合併回 Develop 分支?如果不這麼做,等到時候 Develop 分支完成並且合併回 Master 分支的時候,那個問題就又再次出現了。 那為什麼一開始不從 Develop 分支切出來修?因為 Develop 分支的功能可能尚在開發中,這時候硬是要從這裡切出去修再合併回 Master 分支,只會造成更大的災難。 ### Release 分支 當認為 Develop 分支夠成熟了,就可以把 Develop 分支合併到 Release 分支,在這邊進行算是上線前的最後測試。測試完成後,Release 分支將會同時合併到 Master 以及 Develop 這兩個分支上。Master 分支是上線版本,而合併回 Develop 分支的目的,是因為可能在 Release 分支上還會測到並修正一些問題,所以需要跟 Develop 分支同步,免得之後的版本又再度出現同樣的問題。 ### Feature 分支 當要開始新增功能的時候,就是使用 Feature 分支的時候了。Feature 分支都是從 Develop 分支來的,完成之後會再併回 Develop 分支。
 平時上班時比較自由,老闆通常都可以容許我們一邊聽著歌一邊工作。所以每坐回位置時第一個動入就是把耳機放到耳朵,然後打開 YouTube 播放著歌曲就繼續工作。有時甚至會沒有播著音樂也會插著耳機。 不知道由那時開始 YouTube已經變成了人們的 Music Player,以前的 Winamp, Window Media Player 的 MP3 歌曲列表已經不合時宜。而現在很多音樂公司在新曲發佈時也是最先在 YouTube上發佈,同時也是不用付費就可以隨時隨地收聽。 ### 細心的功能 用上了傳統的純黑色介面來作為介面的主色,令使用者有種來到了電影院的感覺。有一點令筆者覺得十分細心,就是當使用者聽著歌曲時,在 Search Bar 輸入文字找歌曲時,歌曲會一直播放直到使用者按下第二條影片才會跳轉。減少了中間沒有聲音的停頓,也防止了找不到心水歌曲時停了原來的那首歌。 ### 付費功能 有了新的音樂專用介面,當然也加入了付費的功能。就是使用者可以加入成為音樂專用帳戶。那麼在聽歌時就不會再有廣告出現中斷影片了。
Currently 19Site is working on a project need to integrate with Google GSuite. This post is for saving some usable link of documentation.

### OAuth2 Service Account

https://developers.google.com/identity/protocols/OAuth2ServiceAccount

### Google OAuth2 scope list

https://developers.google.com/identity/protocols/googlescopes

### Directory API (Admin SDK)

https://developers.google.com/admin-sdk/directory/v1/guides/authorizing

### Calendar API v3 reference

https://developers.google.com/calendar/v3/reference
### Get files from DOM element

Assume you have an component render a `input` element :

```js
import React from 'react';

class FileComponent extends React.Component {

	render() {

		return ;
	}
}
```

In React way, you first need to add a event handler to this component :

```js
import React from 'react';

class FileComponent extends React.Component {

	onChangeFile(evt) {

		// do something
	}

	render() {

		return  this.onChangeFile(evt) } />;
	}
}
```

Then you may get the files object from `event` parameter :

```js
onChangeFile(evt) {

	var files = evt.target.files;
}
```

### Upload file by using FormData

Add files to `FormData` object :

```js
onChangeFile(evt) {

	// get files
	var files = evt.target.files;

	// if no file selected, exit
	if( files.length === 0 ) {

		return;
	}

	// create form data object
	var formData = new FormData();

	// loop each file
	for( var i = 0; i < files.length; ++i ) {

		// append file to form data object with specified field name (multipart formdata)
		formData.append('file_field_name', files[i]);
	}

	// server url
	var url = 'https://www.example.com/do-file-upload';

	// using Axios http client request to server
	Axios.post(url, formData).then(result => {

		// handle server response
	});
}
```

Axios github : https://github.com/axios/axios
### What is Google Analytics?
Google Analytics (GA) is a data analysis tools provide by Google. It used to analysis website or app (android / ios). Is the most common data analysis tool in current internet. And it is free.
GA official web site : https://analytics.google.com/analytics/web
### Using GA in React
First we need on add react-ga package into your project :
```sh
npm install react-ga --save
```
Package: https://github.com/react-ga/react-ga
Let's create a new component for Google Analytics :
```js
import React from 'react';
import { withRouter } from 'react-router-dom';
import PropTypes from 'prop-types';
class GoogleAnalytics extends React.Component {
render() {
return ` component :
```js
import GoogleAnalytics from './components/GoogleAnalytics.js';
```
```js
render() {
}
```
### Check result
Once your GA setup completed. When you switch page over you site. Your GA current you should be update appropriately.
By using shell scripting, user may automate the process of download and install phpMyAdmin. One thing you setup phpMyAdmin is copy the `config.sample.inc.php` to `config.inc.php` and change the blowfish secret value to a random string.

### command : sed

You may use `sed` command to search and replace string in a file. And using `openssl` to generate a random string.

```sh
sed -i -e "s|\$cfg\['blowfish_secret'\] = ''|\$cfg['blowfish_secret'] = '$(openssl rand -base64 32)'|g" ./config.inc.php
```

The command shown above is an example of `sed` command to generate a random as the blowfish secret value.

### Full sample

Codes below is the full sample for download phpMyAdmin from official web site and extract to machine.

```sh
#! /bin/sh

wget -O /opt/pya.zip https://files.phpmyadmin.net/phpMyAdmin/4.9.0.1/phpMyAdmin-4.9.0.1-all-languages.zip

unzip /opt/pya.zip -d /opt

rm /opt/pya.zip

cp /opt/phpMyAdmin-4.9.0.1-all-languages/config.sample.inc.php /opt/phpMyAdmin-4.9.0.1-all-languages/config.inc.php

sed -i -e "s|\$cfg\['blowfish_secret'\] = ''|\$cfg['blowfish_secret'] = '$(openssl rand -base64 32)'|g" /opt/phpMyAdmin-4.9.0.1-all-languages/config.inc.php
```
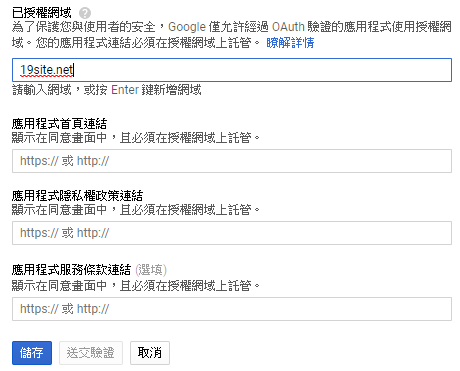
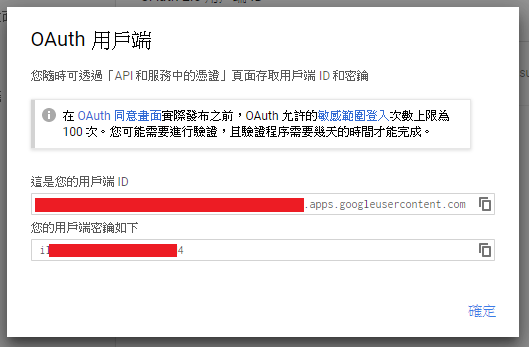
Some time you may want to access to user information from their google account (e.g. Calendar, Email, etc... ). To do so, you first have to create a project on Google API Console and setup OAuth settings.
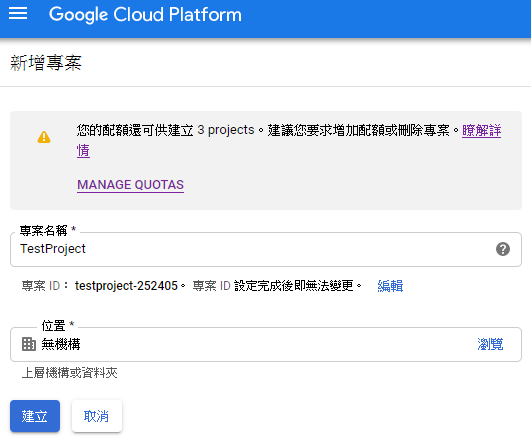
### Create a new project for you application
Create a test project on Google Cloud Platform (Google API Console)
### Setup OAuth 2.0 authorize page
Select API and Service
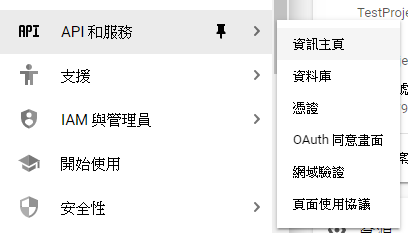
Fill your application name

Fill in you direct URL. (OAuth2.0 need a URL to redirect back to your site form passing the token or code)
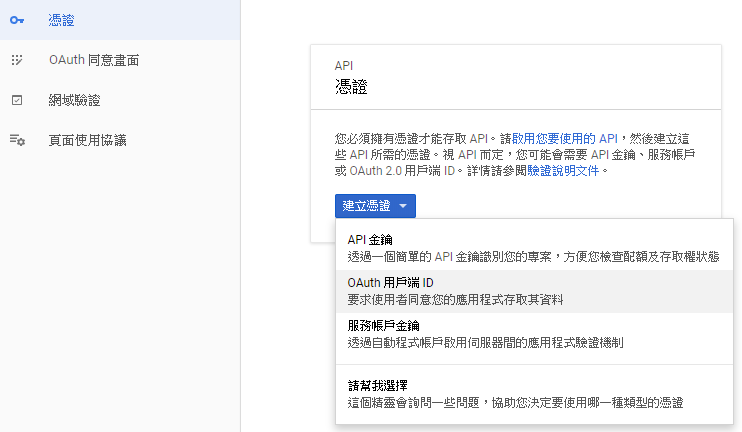
### Setup OAuth 2.0 application client
You have to create an OAuth 2.0 client in order to make it work.
Select application type and fill your web site url. (redirect url)
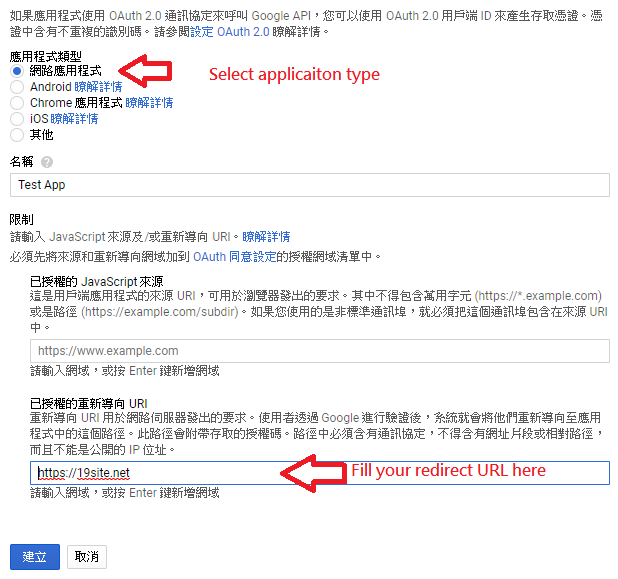
Then you will receive a OAuth2.0 client id and secret key.
That's all of Google part setting.
### Your application
Reference URL : https://developers.google.com/identity/protocols/OAuth2WebServer
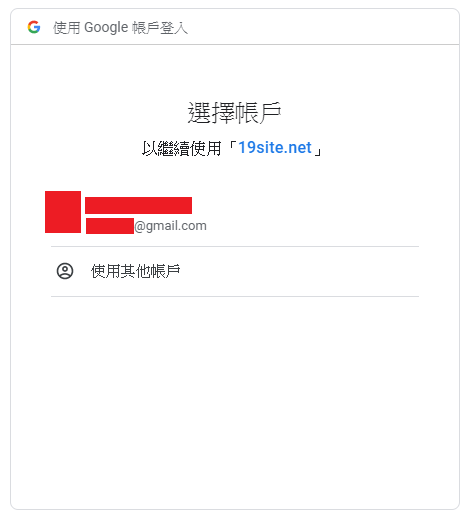
In you application, application may generate a URL to Google OAuth 2.0 server and redirect the user there.
Code below is a example in NodeJs.
```js
var query = Qs.stringify({
scope: 'https://www.googleapis.com/auth/calendar',
access_type: 'offline',
include_granted_scopes: true,
state: 'state_parameter_passthrough_value',
redirect_uri: 'https://19site.net',
response_type: 'code',
client_id:
});
var url = 'https://accounts.google.com/o/oauth2/v2/auth?' + query;
```
The URL will prompt user to select their Google account to continue.
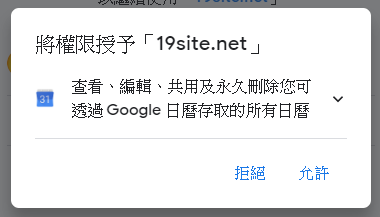
Ask you user to grant the following permission to your application.
Confirm user action.
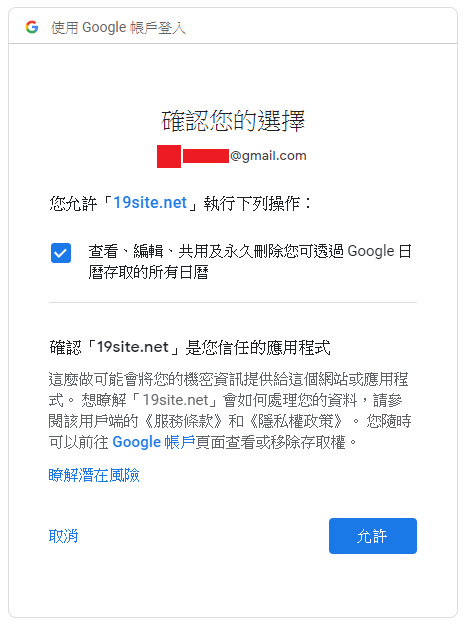
Then user will redirect to the URL that you set (https://19site.com).
Finish : )
### 淺草 第二天的行程是淺草,這天是星期六。剛好是日本四大祭的其中一天,這天會有大型的燈火活動,所以在先前準備行程時安排了這天到淺草參觀,同時也編排了穿日本浴衣的活動。 早上出門後,我們什麼也沒有吃就直接出發到淺草。由池袋區坐地鐵去也要很長的時間。  ')   吃飽後我們就到了剛剛照片那家浴衣店去了。誰知道那家浴衣店原來在淺草區有超多分店的 !!! 我們預訂的那一家是在別的地點 !! (先前也有聽過後多遊客也會遇過這個情況) 經過我們和店員的一輪身體語言和道路教學後,終於找到了我們預訂的那家店了。門面是超多人排隊的呢 !!! 內裡的客人超多,大部份都是本土的年輕男女,可能是有祭典所以都有機會約會他們的伴侶穿浴衣一起賞花火。 店內分上下兩層,下層是結帳及男士換衣服的。而二樓是給女士專用的選衣間及化妝間。由於男士的比較簡單,所以筆者先在下層的位置選了浴衣便去換衣了。會有專人幫助你去換衣服,所以不用怕會不懂得穿。幫助換衣服的是個女士,換衣時會脫淨內褲,她會幫你處理好一切。 當我換好後同行的兩位女士還在坐著沒動,原來是因為女生太多了,所以需要再等多一會時間才能選浴衣。最後差不多要一個半小時後才能全部完成外出活動。埋單 17,000 日圓 ( 2 女 1 男 )。        我們是預定大家下午 5 時半前回到店家還衣服的,不過天氣實在太熱了。行到大約4 時已經很累,所以大約 4 時半就回到店家去還衣服,然先去吃個凍甜品 !!! 真的超爽。再去吃了個迴轉壽司補充體力,準備晚上去看花火大會。 日本的看煙花人流管制做得不錯,大群可以進到大馬路去向花火方向的河進行花火觀賞。人流只可以向前進且不能停留,同一時間煙花也會分階段慢慢的放。所以人流都會有機會能走到橋上近距離看到花火,真的很不錯的體驗。   過穚後原來在穚的另一方已經有大型的封路安排,並在馬路上設有區段供市民可以坐下來賞花火。而我們就走往最近的地鐵站坐地鐵回池袋。  回到池袋已經很累,但是因為草姐後天便會回去,所以我們也到了東口的激安血併了一輪 !!! ( 當然少不了到東口後街夾公仔 )
### 東京 一個我從來沒有踏足過的地方,從以前不能去日本旅遊 (因為褔島核事故安全問題),到現在最近三次旅遊目的地都是日本 ! 開始明白為什麼人們喜歡到日本旅遊了 ! 因為真的好好玩好方便 !!! 那天是乘坐早上機的 (大約十一時),但是飛機遲了起飛,大約差不多遲了一個小時。到達成田機場時已經進入黃昏了。   ') 到了池袋天色已經黑齊了,我們急急找到了酒店放下行季後,便下樓找吃的東西。  太累了,吃飽了東西後就到附近的 7-11 買了些少零食後就回酒店休息了。
Sometime you may want to insert a `tab` character (for indent) in a `textarea` element. By default when user hit the `tab` key the current focus element will move to the next element.

### Add a \t into your current position

By insert a `\t` character right after the current cursor position

```js
// target element
$('#my-textarea').on('keydown', function(evt) {

	// get the key code
	var keyCode = evt.keyCode || evt.which;

	// tab key
	if (keyCode == 9) {

		// prevent default action of key down
		evt.preventDefault();

		// get the textarea DOMElement
		var textarea = this;

		// get the value of textarea
		var value = $(textarea).val();

		// get the cursor current position
		var start = textarea.selectionStart;

		// get the cursor selection end position (if there some text selected)
		var end = textarea.selectionEnd;

		// string before start position
		var start_string = value.substring(0, start);

		// string after end position
		var end_string = value.substring(end, value.length);

		// insert string
		var insert_string = '\t';

		// insert the insert string between string string and end string
		var new_value = start_string + insert_string + end_string;

		// set a new value to textarea
		$(textarea).val(new_value);

		// set the cursor position right after the string just inserted
		textarea.setSelectionRange(start + insert_string.length, start + insert_string.length);
	}
});
```
### What is Drag and Drop?

Drag and drop is a event to handle user mouse action. Drag any thing into an area (e.g. `<div>`) will fire appropriate events.

There are 4 events you have to handle:

1. dragenter
2. dragleave
3. dragover
4. drop

### Event:  dragenter

This event will file when user drag anythings into the target area. Only fire when entering the DOMElement.

### Event:  dragleave

This event will file when user drag anythings out the target area. Only fire once when leaving the DOMElement.

### Event:  dragover

This event will file when user drag anythings onto the target area. Event will keep firing when mouse dragged something and moving over the target area.

### Event:  drop

This event will file when user drop anythings into the target area. Only fire once when dragging items dropped into the DOMElement.

### Add event listener to DOMElement

The following code shows how to add event listeners to those events:

```js
var div = document.getElementById('my-div');

div.addEventListener('dragenter', evt => {
	// do something
});

div.addEventListener('dragleave', evt => {
	// do something
});

div.addEventListener('dragover', evt => {
	// do something
});

div.addEventListener('drop', evt => {
	// do something
});
```

The above sample is for standard javascript with jquery.

### Do in React way

In react, you may use `ref` to accomplish this.

```js
class YourDragAndDropComponent extends Component {

	dropRef = React.createRef();

	constructor(props) {

		super(props);

		this.state = {};

		this.onDragEnter = this.onDragEnter.bind(this);

		this.onDragLeave = this.onDragLeave.bind(this);

		this.onDragOver = this.onDragOver.bind(this);

		this.onDrop = this.onDrop.bind(this);
	}

	componentDidMount() {

		const div = this.dropRef.current;

		div.addEventListener('dragenter', this.onDragEnter);

		div.addEventListener('dragleave', this.onDragLeave);

		div.addEventListener('dragover', this.onDragOver);

		div.addEventListener('drop', this.onDrop);
	}

	componentWillUnmount() {

		const div = this.dropRef.current;

		div.removeEventListener('dragenter', this.onDragEnter);

		div.removeEventListener('dragleave', this.onDragLeave);

		div.removeEventListener('dragover', this.onDragOver);

		div.removeEventListener('drop', this.onDrop);
	}

	onDragEnter(event) {
		// todo
	}

	onDragLeave(event) {
		// todo
	}

	onDragOver(event) {
		// todo
	}

	onDrop(event) {
		// todo
	}

	render() {

		return (


		);
	]
}
```
新版的 GOOGLE SITE 的確是一個強勁的東西!

可以好像做 PPT 一樣,就可以完成一個網站了。還會自帶有 responsive 功能,雖然比起舊版會有較多排版上的限制 (因為要預留 responsive 的空間),但是輕輕幾下就可以製作出十分耀眼的網站!

這裡做了一個 [Demo Site](https://sites.google.com/view/pet-cloud) ,大約用了 2 個小時左右。
不知道可時開始 GOOGLE MAP 已經收費了,大概是在大半年前有客戶的網站內,GOOGLE MAP 彈出了 "這個網頁無法正確載入 Google 地圖。" 這句說話。當時也沒有太大的理會!時至今日那個客戶的網站依然是掛著這句說話在 GOOGLE MAP 上,他也好像不太想理會了!可能是因為地圖只會用在聯絡我們上! ↓ 雖然有這個說話彈出來,但是所有的功能是依然能正常運作的,在背景上多了 "for development purposes only" 字樣。 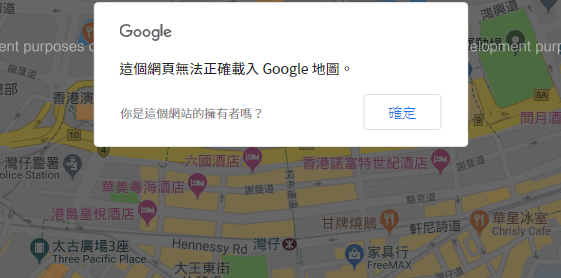 定價方案 : https://cloud.google.com/maps-platform/pricing/sheet ↓ 每個月有 $200 美元的免費使用額度,超過了便會開始收費!(算是佛心?) 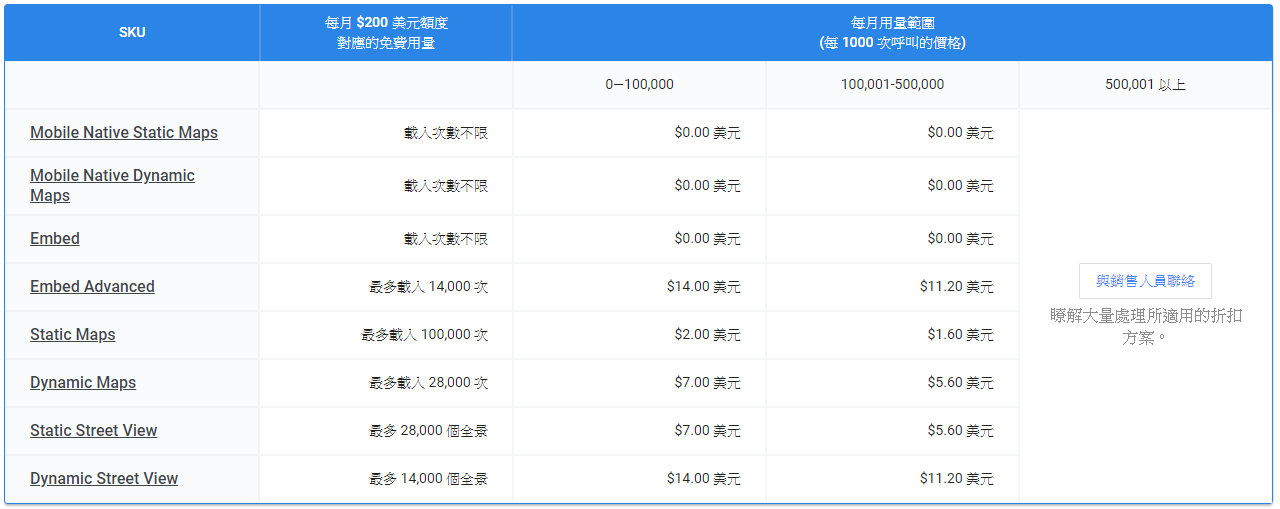
 在名古屋的一所扭蛋店裏居然找到了公主系列的扭蛋!當然不能錯過要扭幾個回來!!! 雖然找不到白雪公主的扭蛋 (真是可惜),不過愛麗絲也是絕對值得入手的!      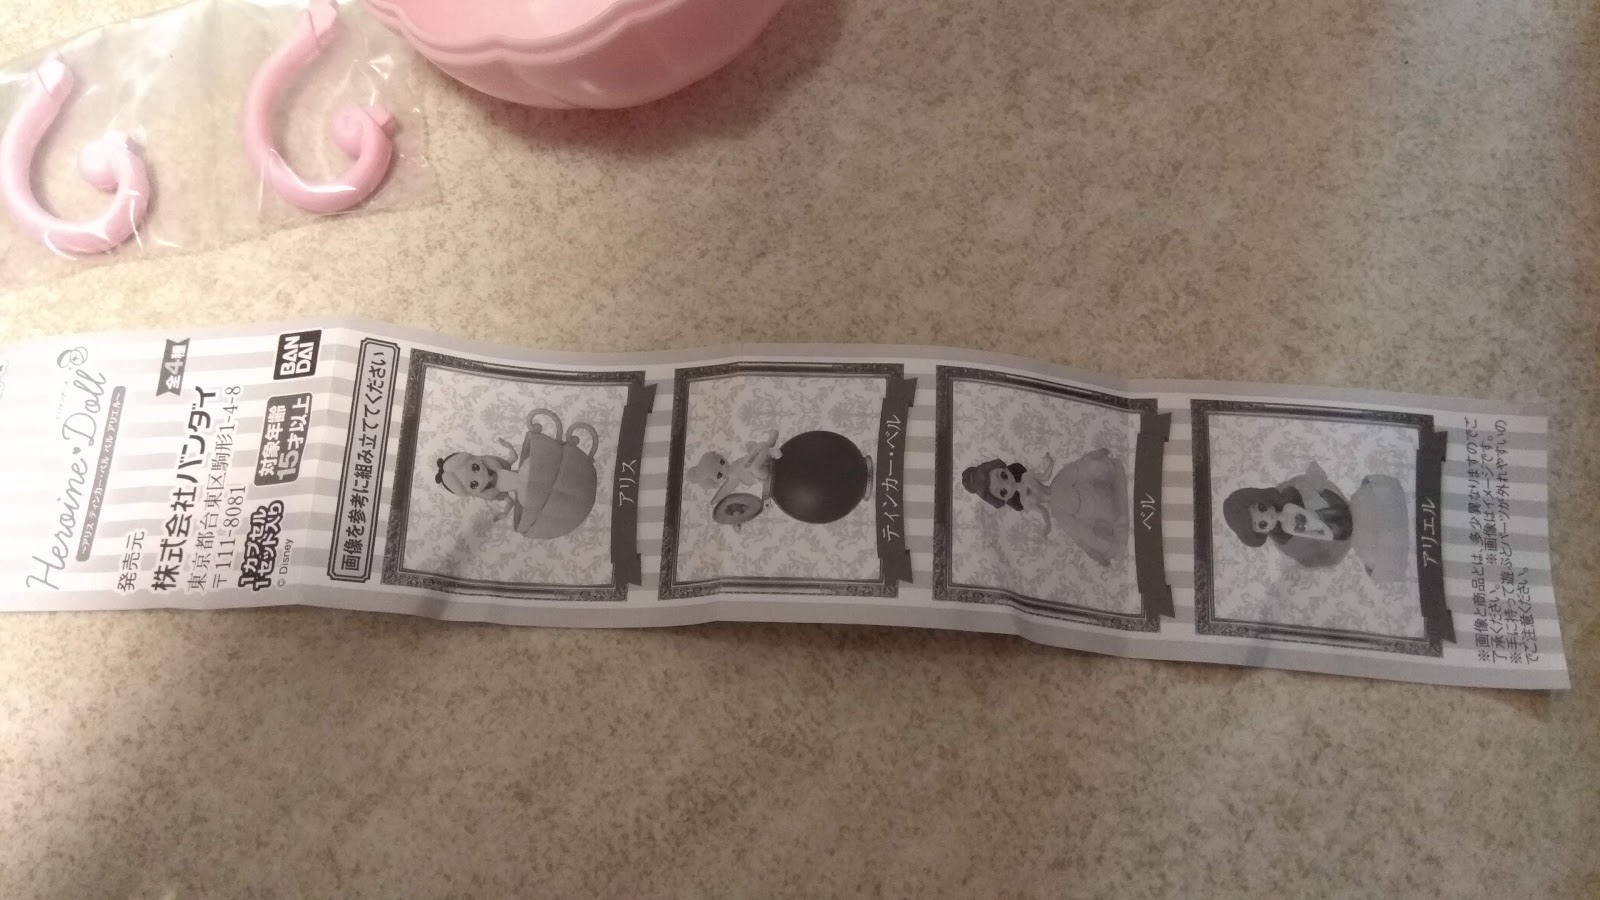        這個公主系列的扭蛋在香港的現時點賣到 $90,貝兒的 $100+,受喜愛程度十分高!
在香港如果要去機場的話,我們可以選擇巴士、港鐵及的士,當中時間最穩定一定是港鐵。但前提是你出發的地點是近港鐵站。但是坐港鐵來回機場也不便宜,單程青衣到機場已經要 60 元,但是其實有方法可以買到更平的車票的!以下會講解一下小弟試過的方法。 我們乘坐港鐵的時候通常也會在售票處先購買車票,然後使用車票乘搭港鐵。但是如果乘坐機場快線的話,我們是可以先到旅行社購買來回的套票,一般都會比在港鐵售票處買的便宜。 另外如果你有 wechat 的話,那麼便可以直接在 wechat 的錢包內購買機場快線車票,流程十分簡單。只要你在錢包內選擇交通,然後選擇機場快線車票,選擇出發的地點及日期,便可以使用 wechat 錢包付款。付款後會有確認的電子郵件寄到你的電郵信箱,電郵內會包含一組二維碼,該二維碼是用來入閘時使用的,wechat 的交通套票是由 klook 包辦的,所以不用擔心。到了港鐵的閘機,只需要打開電郵的二維碼放到入閘機的素描器上,使可以過閘。    
Nothing is better than rewrite from sketches, Its does not need to handle old staff.

Last year, my first blog started using Google Blogger. I had modify a lot of XML to customize the layout to fit my needs. It is possible to do many things on Blogger by still a lot cannot. After invent so much time on it, I started write a Blog CMS using Laravel (PHP). It is funny and easy to make anythings fit my idea.

I added a code editor into CMS so that I can customize each post...  But this is a bad idea apparently. haha. I am too lazy to write every post in html code. Finally the blog leave abandoned about half year...

( This blog using Markdown to write post )

Recently I wanted to try some new thing (thing is not new but I never used before). So I choose Koa + React to revamp the old blog again. Hope every thing is OK : )

## What is React?
A JavaScript library for building user interfaces.
https://reactjs.org

React is a Javascript library develop by Facebook. It is a frontend library help developer to build UI components.

## What is Markdown?
Markdown is a type of syntax that format your text context to display HTML appropriately.
[Markdown-Cheatsheet](https://github.com/adam-p/markdown-here/wiki/Markdown-Cheatsheet)

This is a Markdown document demonstrate the syntax and result.
> 原文網址 : https://blog.csdn.net/zbw18297786698/article/details/54349046 在項目中驗證 SQL 語句執行效率的時候最直觀的方式就是查看其執行時間,但是在線上環境中如果不慎運行一個效率十分低下的 SQL 導致數據庫當掉了,那就悲劇了。並且只看執行時間,並無法有效的定位影響效率的原因。因此通過 `EXPLAIN` 命令查看SQL語句的執行計劃,根據執行計劃可以對SQL進行相應的優化。理解SQL執行計劃各個字段的含義這時候顯得十分重要。 如下圖 ```sql EXPLAIN SELECT COUNT(*) FROM blog ```  這是一個簡單的 SQL 的執行計劃,可以看到其包含十個字段來描述這個執行計劃。 其中比較重要的字段有 `select_type`、`type`、`ref`、`extra` 。 下面為更好的理解執行計劃,這裡對每個字段進行相應的解釋。 ### id 一個複雜的sql會生成多執行計劃如下圖: ```sql EXPLAIN SELECT COUNT(*) FROM (SELECT id from blog where id = 1) a ```  可以看到含有子查詢的sql產生了兩條記錄,分別表示該條sql的執行順序。 ### select_type 查詢類型,有如下幾種值 1. simple 表示簡單查詢,沒有子查詢和union 如圖1所示 2. primary 最外邊的select,在有子查詢的情況下最外邊的select查詢就是這種類型如圖2所示 3. union union語句的後一個語句執行的時候為該類型如圖2.1所示 ```sql EXPLAIN SELECT COUNT(*) FROM blog UNION SELECT id from blog where id = 1 ```  union result union語句的結果如圖所示。 ### table 使用的表名 ### type 連接類型,十分重要的字段 按照代表的效果由最優到最差情況進行介紹。 #### system 表僅有一行 const的特例。 #### const 最多匹配一行並且使用 `PRIMARY KEY` 或 `UNIQUE` 索引,才會是 `const`。 ```sql EXPLAIN SELECT * FROM blog where id =1 ```  下面這種情況搜索到一條數據但是沒有用到主鍵或索引 所以 type 不是 `const` 關於all的含義將在下文介紹 ```sql EXPLAIN SELECT * FROM blog LIMIT 1 ```  #### eq_ref 根據 MYSQL 官方手冊的解釋: "對於每個來自於前面的表的行組合,從該表中讀取一行。這可能是除了 `const` 類型最好的聯接類型。它用在一個索引的所有部分被聯接使用並且索引是 `UNIQUE` 或`PRIMARY KEY`。 `eq_ref` 可以用於使用=比較帶索引的列。看下面的語句 ```sql EXPLAIN SELECT * FROM blog, author where blog.blog_author_id = author.id ```  ```sql EXPLAIN SELECT * FROM author, blog where blog_author_id = author.id ```  #### ref 對於所有取自前表的行組合,所有的匹配項都是通過索引讀出的。也可以理解為連接不能基於關鍵字選擇單個行,可能查找到多個符合條件的行。叫做 `ref` 是因為索引要跟某個參考值相比較。這個參考值或者是一 個常數,或者是來自一個表裡的多表查詢的 結果值。 如下圖 ```sql EXPLAIN SELECT * FROM blog where blog_author_id = 2 // 其中blog_author_id有索引 ```  寫到這裡 相信大家還是對以上各種類型的解釋有點迷迷糊糊。下面看一個等值連接的例子,會加深對索引和以上解釋的理解。 ```sql SELECT * FROM author, blog where author.id=blog.blog_author_id and author.id = 2 ``` 這條語句查出作者2發表的所有博客。 id為author表主鍵,mysql會自動為主鍵創建唯一索引。而blog_author_id是blog一個普通字段,如果對其加個索引看一下運行的效果。  先觀察下一下這個執行計劃,可以看出 MYSQL 對 SQL 語句的執行已經做了很好的優化.這裡可以看到其中一條優化規則,先做選擇操作縮小連接操作的集合維度,再做連接操作,詳細可查看 MYSQL 生成執行計劃的優化策略。 解釋一下:第一行代表 MYSQL 生成的第一個執行計劃。即 `select * from author where id= 2` 由於 `id` 是 `author` 表的主鍵,且表包含多條數據但僅命中一行,所以其類型為 `const`。 第二行:對於 `blog` 表中 `auhorid` 為 2 的記錄有多個,且是通過索引讀出的。滿足 `ref` 的條件。 自然而然 如果把 `blog` 表中的 `author_id` 所以去除掉,則其類型應該不會再是 `ref`。讓我們來驗證這個想法。 ```sql drop index author_id on blog ``` 再來執行以下查詢語句  可以看到 `type` 類型變為 `ALL` 了,這種類型的效率非常慢,同時你可以看到 rows 這一行數據也發生了變化。由於沒有索引,所以需要掃描全表。詳細關於 `ALL` 類型和 rows 列的含義將在下文中介紹。 下面接著看下一個類型。 #### ref_or_null 如同 ref,但是添加了 MySQL 可以專門搜索包含 NULL 值的行。在解決子查詢中經常使用該聯接類型的優化。或解釋為MySQL 必須在初次查找的結果 裡找出 null 條目,然後進行二次查找。 這種類型沒搞明白 做實驗都沒出現這種類型 希望各位朋友給個例子。 但是上面說的這五種類型是屬於總體來說效果很不錯的了。如果能滿足以上類型的查詢 基本上不需要太大的優化、下面介紹效率較低幾種類型 當出現以下幾種類型的查詢 就要好好考慮做做優化了。 #### index_merge 該聯接類型表示使用了索引合併優化方法。在這種情況下,key列包含了使用的索引的清單,key_len包含了使用的索引的最長的關鍵元素。查看下面這條sql ```sql EXPLAIN SELECT * FROM blog where blog_title = "first" and blog_author_id = 1 ```  大致解釋一下索引和並優化的概念,這時mysql針對sql使用多個索引進行查詢時的優化方案。通俗的說就是mysql會把同一個表的多個索引掃描的結果進行合併。詳細的去看看相關博客。 解釋一下上述的例子,分別對blog_title和authorid創建索引,這時用and查詢滿足以上兩種條件的結果,如果查到一條的話它就是ref 但是如果匹配多條的話他就會進行索引合併。 #### unique_subquery 顧名思義 subquery可以看出這種類型跟子查詢有關係,同時大家知道子查詢在mysql中是十分不建議使用的一種查詢方式,當遇到子查詢時多思考如果通過連接查詢來優化。盡可能少的使用IN語句。 在某些 IN 查詢中使用此種類型,而不是常規的 ref:value IN (SELECT primary_key FROM single_table WHERE some_expr) ```sql EXPLAIN SELECT * FROM blog where blog_author_id in (SELECT id from author where author_name = 'test1') ```  即使對 authorname 創建索引也是相同的執行計劃 對於這種情況你可以將其改寫成一個 left join 語句 ```sql SELECT blog.* FROM blog LEFT JOIN author ON blog_author_id = author.id WHERE author_name = 'test1' ``` 一樣的執行結果 但是執行計劃就是不同的如下圖  可見這種查詢就是用到了索引。效率可想而知。 #### index_subquery 在某些 IN 查詢中使用此種類型, 與 unique_subquery 類似,但是查詢的是非唯一性索引: ```sql value IN (SELECT key_column FROM single_table WHERE some_expr) ``` ```sql EXPLAIN SELECT * FROM author where id in ( SELECT blog_author_id from blog where blog_title = 'secend') ```  同樣的要盡量避免使用這種方式的查詢。 ### range 顧名思義,range意思就是范圍。因此可以解釋為:只檢索給定範圍的行,使用一個索引來選擇 行。 key 列顯示使用了哪個索引。當使用=、 <>、>、>=、<、<=、IS NULL、<=>、BETWEEN 或者 IN 操作符,用常量比較關鍵字列時,可 以使用 range。 這種類型解釋的很清楚了 稍微舉個栗子大家看看吧。 ```sql EXPLAIN SELECT * FROM blog where id > 2 ```  #### index 這種類型的意思也十分明顯,查詢過程中使用到了索引。解釋為: 全表掃描,只是掃描表的時候按照索引次序 進行而不是行。主要優點就是避免了排序, 但是開銷仍然非常大。舉個栗子 ```sql EXPLAIN SELECT * FROM blog ORDER BY id ```  #### all 最壞的情況,從頭到尾全表掃描 。性能最差的一種類型 遇到這種類型 你得想想 為什麼不建索引!為什麼 不改造 sql!改造sql也是為了讓mysql運行的時候盡可能的使用到索引, 這裡又牽扯出一個問題 如何建索引 數據庫維護索引也是一件十分費時費力的事情。詳細內容自行查詢 本人還未總結~~~ 這個就不舉例子了 大家看看上邊的例子 有很多連接查詢計劃中都存在all類型,順便想想如何優化。 解釋到這里大家對執行計劃所代表的效率含義基本上有個認識了,現在對後面的字段進行介紹。 ### possible_keys 很明顯了 它的意思就是有可能使用到的索引。 ### key MySQL 實際從 possible_key 選擇使用的索引。如果為 NULL,則沒有使用索引。很少的情況 下,MYSQL 會選擇優化不足的索引。這種情 況下,可以在 SELECT 語句中使用 USE INDEX (indexname)來強制使用一個索引或者用 IGNORE INDEX(indexname)來強制 MYSQL 忽略索引。 ### key_length 使用索引的長度。當然在不失精度的情況下 長度越小越好! ### ref 顯示索引的那一列被引用到了。 ### rows MYSQL 認為必須檢查的用來返回請求數據的行數,越大越不好。說明沒有很好的使用到索引。 ### Extra 表示mysql解決查詢的詳細信息。 #### Using Index 表示使用到索引 #### using filesort 表示 MySQL 會對結果使用一個外部索引排序,而不是從表裡按索引次序讀到相關內容。可能在內存或者磁盤上進行排序。 MySQL 中無法利用索引完成的排序操作稱為“文件排序” 常見於 order by 和group by語句中。注意如果你對排序列創建索引mysql仍然會提示你使用的是filesort,所以對於這個字段應該有自己的判斷。 ```sql EXPLAIN SELECT * FROM blog order by blog_title ```  #### Using temporary 表示進行查詢時使用到臨時表。當使用到臨時表時,表示sql的效率需要進行相應的優化了。這種類型可能會在連接排序查詢中出現。 為了便於理解先舉一個例子。 ```sql EXPLAIN SELECT * FROM author,blog where author.id=blog.blog_author_id and blog.blog_title='first' order by author.id desc ```  這條語句是要查出寫first這篇博客的博主信息,並按用戶id排序。 先來看看mysql連接查詢算法 Nested Loop Join 通過驅動表的結果集,一條一條的按照連接條件查詢下個表中的記錄。 這裡出現了一個名詞 驅動表 驅動表定義: 1. 當連接條件確定時,查詢條件篩選後記錄少的為驅動表。 2. 當連接條件不確定時,行數少的表為驅動表。 按照上述定義,由於blog_tiltle經過篩選條件後查詢得到的記錄數為2,而未對author表進行條件過濾,因此該sql的驅動表為blog。 將過濾後的blog表的記錄一條條的對author表查詢,而後合併,這時需要按照author表的id字段進行排序,因此需要對合併結果(臨時表)進行排序。 如果按照驅動表排序,則可以直接排序而無需臨時表。 ```sql EXPLAIN SELECT * FROM author,blog where author.id=blog.blog_author_id and blog.blog_title='first' order by blog.id desc ``` 
Any system authorized by user and password is possible hacked by password dictionary hacking. So we need to define some rule to identify who is hacking your system and who is not. We usually use retry times to identify this. When a user entered wrong password for 'N' times. System will do some action (by blocking IP address or disabled the user for a few hours) to prevent password retry many times. And here is a nice software to provide this service.

### fail2ban
Fail2ban is a software that will parse (most common) application log files. When continuous error found. Fail2ban will setup a rule on firewall to block the access from target IP address. Aim to protect your system from unauthorized access.

### Install
You may run the following commands to install fail2ban to your system.
```sh
$ sudo apt-get update
$ sudo apt-get install fail2ban -y
$ sudo service fail2ban start
```
For more information please visit :
[fail2ban official site](https://www.fail2ban.org/wiki/index.php/Fail2Ban)
### Why you need to disable root login from SSH?
Allow root login from remote server is danger and it is no recommended. Because root account has the highest privilege to modify the whole system. You may replace root login by using `SUDO` command with `SUDO` enabled users or login to SSH by using SSH Key.

### How to disable root login
We can follow the steps below to disable root (or specified user) login via SSH:

Step 1. Edit /etc/ssh/sshd_config
```sh
$ vi /etc/ssh/sshd_config
```

Step 2. Find the following line and set the value to `no`
```sh
PermitRootLogin no
```

If you want to disable specified user, you may change the following line:
```sh
DenyUsers USERNAME
```

Step 3. Restart SSH service

Finish !
### View system distribution ```sh $ cat /etc/*release ``` ### Check memory state ```sh $ free -mh ``` ## Check system state ```sh $ top ``` ### View file system ```sh $ df -h ``` ### List system running process ```sh $ ps aux ``` filter by keyword ```sh $ ps aux | grep``` ### List system listening port ```sh $ netstat -tlnp ``` ### Extract .tar.gz file ```sh $ tar zxvf ``` ### Compress a file / folder to .tar.gz ```sh $ tar zcvf